Hillside and Slope Drainage: Controlling Erosion and Runoff
Gravity is relentless. On flat ground, poor drainage is an inconvenience—on a hillside, it becomes a destructive force. Hillside drainage is the discipline of intercepting, slowing, and redirecting water as it moves down a slope so that it doesn't erode soil, undermine structures, or flood the properties below. Whether you're dealing with a gentle 10% grade behind your house or a steep 2:1 embankment at the edge of your lot, understanding how water behaves on slopes is the first step toward slope erosion control that actually works.
Every year, billions of dollars in property damage across the United States are attributed to slope failures, erosion, and uncontrolled runoff. The culprit is almost always water—either too much of it arriving too fast, or drainage systems that were never designed for the terrain they serve. This guide covers the physics of hillside water flow, the engineering principles behind effective drainage, and the specific techniques homeowners and contractors can deploy to protect sloped properties from erosion and runoff damage.
Understanding Water Behavior on Slopes
Before you can control water on a hillside, you need to understand how it moves. Water on a slope behaves fundamentally differently than water on flat ground. On level terrain, rainfall infiltrates the soil relatively evenly, with excess ponding in low spots. On a slope, gravity accelerates surface water downhill almost immediately, and the steeper the slope, the faster the flow and the greater its erosive energy.
The key variable is velocity. The velocity of sheet flow across a slope increases with both the gradient and the length of the uninterrupted slope. A raindrop landing at the top of a 100-foot slope gains energy as it travels, and by the time it reaches the bottom, it's moving fast enough to detach and transport soil particles. This is why you'll often see the worst erosion at the toe (bottom) of a hillside—that's where the cumulative energy of all the water above concentrates.
There are three primary types of erosion on slopes. Sheet erosion is the uniform removal of a thin layer of soil across the surface—subtle but devastating over time. Rill erosion occurs when sheet flow concentrates into small channels, cutting visible grooves into the slope. Left unchecked, rills become gully erosion, where channels deepen and widen until they threaten structural stability. Effective hillside drainage addresses all three by reducing water velocity, breaking up flow paths, and armoring vulnerable areas.
Subsurface water behavior matters just as much as surface runoff. On slopes, groundwater can travel laterally through permeable soil layers, emerging as seeps or springs lower on the hillside. These saturated zones weaken soil cohesion and can trigger shallow landslides. A comprehensive hillside drainage plan must account for both surface and subsurface water movement. Tools like the NRCS Web Soil Survey can help you identify your soil's hydrologic group and infiltration characteristics, which directly influence how much water runs off versus soaks in.
Assessing Your Hillside Drainage Problem
Effective slope erosion control begins with a thorough site assessment. Before installing any drainage infrastructure, you need to understand the specific conditions on your property—what's causing the problem, where water is coming from, and where it needs to go.
Reading the Signs of Erosion
Walk your slope after a heavy rain and look for telltale indicators. Exposed root systems on trees and shrubs indicate that the surrounding soil has been stripped away. Sediment deposits at the base of the slope—fans of sand, silt, or gravel—reveal where concentrated flow is exiting the hillside. Cracks in the soil surface, especially horizontal cracks running across the slope, can indicate subsurface movement and potential slide risk. Leaning fence posts, tilted retaining walls, and foundation cracks in downhill structures are all red flags that drainage problems have progressed beyond cosmetic damage.
Measuring Slope Gradient
Slope gradient is typically expressed as a ratio (e.g., 3:1, meaning three feet of horizontal distance for every one foot of vertical rise), a percentage (33%), or in degrees (18.4°). You can measure gradient with a tape measure and level, a clinometer, or a smartphone app. Knowing your exact gradient is critical because it determines which drainage techniques are appropriate:
- Slopes gentler than 4:1 (25%): Standard grading and swale techniques work well. Turf grass can stabilize these slopes with proper establishment.
- Slopes between 4:1 and 2:1 (25%–50%): Require more aggressive erosion control—terracing, retaining walls, or engineered drainage systems become necessary.
- Slopes steeper than 2:1 (50%): Demand professional engineering. These slopes are inherently unstable and require structural solutions, deep-rooted vegetation, and often subsurface drainage.
Identifying Water Sources
Not all hillside water comes from direct rainfall. Common sources include roof runoff from uphill structures, irrigation overspray, septic system effluent, natural springs and seeps, and concentrated discharge from neighboring properties. Identifying the source determines the solution. Roof runoff can be captured in gutters and piped away. Irrigation issues are solved by adjusting systems. Natural groundwater requires subsurface interception. Each source demands a different approach.
Soil Analysis
Your soil type profoundly affects drainage behavior. Clay soils have low permeability—water runs off rather than soaking in, increasing surface erosion risk. Sandy soils drain quickly but are easily displaced by flowing water. Silty soils are the most erodible of all, with particles small enough to be suspended in even slow-moving water but without the cohesive properties of clay. A simple jar test (settling soil in water to observe the proportions of sand, silt, and clay) gives you a rough idea of your soil composition. For critical applications, a geotechnical report provides precise data on soil strength, permeability, and stability.
Surface Drainage Techniques for Hillsides
Surface drainage is the first line of defense against hillside erosion. The goal is to intercept water before it gains destructive velocity and redirect it to safe discharge points.
Contour Swales and Berms
A contour swale is a shallow, vegetated channel that runs across a slope following a contour line (a line of constant elevation). Water flowing downhill hits the swale and is redirected laterally along the slope at a controlled gradient—typically 1% to 2%—toward an outlet. Berms (raised earth ridges) on the downhill side of swales increase their capacity and prevent overtopping.
For effective hillside drainage, swales should be spaced at intervals determined by slope length and gradient. On a 3:1 slope, swales every 30 to 50 feet of slope length prevent water from building enough velocity to cause rill erosion. On steeper slopes, spacing should decrease to every 15 to 25 feet. Swales should be lined with dense vegetation or erosion control matting to prevent the channel itself from eroding.
Diversion Ditches and Interceptor Drains
Where swales aren't sufficient, engineered diversion ditches provide higher-capacity interception. These are deeper, more defined channels—often lined with riprap (loose stone), concrete, or geosynthetic materials—designed to handle concentrated flow. An interceptor drain placed across the slope above a home or structure captures all upslope runoff and routes it around the building to a safe discharge point.
The critical design consideration for diversion ditches is outlet design. A ditch that concentrates water and dumps it at a single point without energy dissipation will simply move the erosion problem downstream. Outlets should include riprap aprons, level spreaders, or stilling basins that slow the water and spread it out before it reenters the natural drainage system.
Terracing
Terracing transforms a continuous slope into a series of level or near-level steps, dramatically reducing the effective slope length and giving water time to infiltrate. It's one of the oldest and most effective slope erosion control techniques, used in agriculture for thousands of years and equally applicable to residential properties.
Residential terraces can be created with retaining walls (stone, concrete block, timber, or gabion baskets), planted slopes between level benches, or a combination of both. Each terrace level should have its own drainage—either a shallow swale at the back of the bench that directs water to a downspout or drain pipe, or permeable surfaces that allow infiltration.
Key terracing principles include:
- Individual wall height should not exceed 4 feet without engineered design (most building codes require permits and engineering for walls over 4 feet).
- Setback distance between terrace walls should be at least equal to the wall height to prevent surcharge loading.
- Drainage behind walls is essential—every retaining wall needs a gravel backfill zone and weep holes or a perforated drain pipe to prevent hydrostatic pressure buildup.
- Terrace surfaces should slope slightly (1%–2%) toward the back of the bench to capture water in the drainage system rather than allowing it to cascade over the wall face.
Subsurface Drainage Systems for Slopes
Surface techniques handle overland flow, but subsurface drainage addresses the water you can't see—groundwater moving through soil layers, perched water tables, and seepage zones that destabilize slopes from within.
French Drains on Hillsides
A French drain is a gravel-filled trench containing a perforated pipe that collects and conveys groundwater. On hillsides, French drains are installed along contour lines to intercept lateral groundwater flow before it reaches structures or saturates the slope face. The perforated pipe sits at the bottom of the trench, surrounded by clean, washed gravel (typically ¾-inch to 1½-inch stone), and wrapped in filter fabric to prevent soil migration into the gravel.
Designing French drains for slopes requires attention to pipe gradient. The pipe should slope at 1% to 2% toward the outlet—steep enough to maintain flow but not so steep that water velocity causes internal erosion of the trench fill. On long runs, cleanouts should be installed every 100 feet and at every change in direction to allow maintenance flushing.
Trench depth depends on the depth of the water-bearing soil layer you're trying to intercept. A typical residential French drain is 18 to 24 inches deep, but on hillsides with deep seepage problems, drains may need to be 3 to 4 feet deep to reach the problematic layer. Geotechnical investigation helps determine optimal depth.
Curtain Drains and Interceptor Trenches
A curtain drain (also called a blind drain) is similar to a French drain but is specifically designed to intercept a broad front of groundwater moving laterally through a slope. Curtain drains are typically installed in a line across the slope, perpendicular to the direction of groundwater flow. They're especially effective where a permeable soil layer sits atop an impermeable layer (like sand over clay), creating a perched water table that feeds seeps and springs.
The trench should penetrate through the permeable layer and key into the impermeable layer below to fully intercept the flow. Filter fabric is critical here—without it, fine soil particles migrate into the gravel over time, clogging the drain and rendering it useless within a few years.
Horizontal Drains (Hydrauger Drains)
For severe hillside drainage problems—particularly where deep groundwater is causing slope instability—horizontal drains (sometimes called hydrauger drains) may be necessary. These are small-diameter perforated pipes drilled horizontally into the slope face to tap into water-bearing zones and drain them by gravity. This technique is common in highway and large-scale civil engineering but is occasionally used in residential applications where slope failure threatens structures.
Horizontal drains require professional installation by a geotechnical contractor. They're typically 2 to 4 inches in diameter and can extend 50 to 200 feet into the slope. The outlets must be maintained and protected from damage, as a blocked horizontal drain can actually worsen slope stability by creating a pressurized water pocket.
Erosion Control Materials and Armoring
Where water must flow across exposed soil—during construction, while vegetation establishes, or in permanently high-flow areas—erosion control materials provide physical protection against soil displacement.
Erosion Control Blankets and Mats
Erosion control blankets (ECBs) are biodegradable or synthetic fabrics placed over bare soil to shield it from raindrop impact and slow surface flow. Biodegradable options—made from straw, coconut coir, or wood fiber—decompose over 12 to 36 months as vegetation establishes beneath them. Permanent turf reinforcement mats (TRMs) are synthetic products that remain in place permanently, with vegetation growing through them to create a reinforced root-soil-mat composite.
For slopes steeper than 3:1, double-net or high-performance blankets are recommended. Installation requires direct soil contact (no air gaps), stapling at 2- to 4-foot intervals, and proper overlap at seams (minimum 4 inches on sides, 6 inches at ends, with uphill blankets overlapping downhill blankets shingle-style).
Riprap and Rock Armoring
Riprap—angular stone placed on slopes or in channels—dissipates water energy and prevents erosion in high-flow areas. It's commonly used at drain outlets, along diversion channels, at the toe of slopes, and in concentrated flow paths where vegetation alone can't withstand the hydraulic forces.
Riprap sizing depends on flow velocity and slope gradient. For most residential hillside drainage applications, D50 stone sizes (the median stone diameter) of 4 to 8 inches are sufficient. The riprap layer should be at least 1.5 times the D50 thickness and placed over a geotextile filter fabric to prevent underlying soil from washing through the stone layer.
Gabion Baskets and Mattresses
Gabions are wire mesh baskets filled with stone, used to create retaining structures, channel linings, and slope armoring. They're particularly useful on hillsides because they're permeable (allowing water to pass through rather than building up hydrostatic pressure behind them), flexible (they can accommodate minor ground movement without failing), and relatively easy to install on steep terrain where concrete work would be difficult.
Gabion mattresses—shallow, flat gabion units—can be laid directly on slope surfaces as erosion protection. Gabion walls provide structural retention while simultaneously serving as drainage elements. For walls over 3 feet tall, engineering design is recommended to ensure stability against overturning and sliding.
Vegetation Strategies for Slope Stabilization
Plants are nature's erosion control system. Root networks bind soil particles together, canopy cover shields the surface from raindrop impact, and plant material slows surface flow. On hillsides, strategic vegetation is not just landscaping—it's infrastructure.
Root Architecture Matters
Not all root systems are equally effective at stabilizing slopes. Fibrous root systems (dense networks of fine roots near the surface) are excellent at preventing sheet erosion. Tap root systems (deep, anchoring roots) provide resistance against deeper soil movement. The most effective slope stabilization plantings combine both types.
Grasses and sedges provide immediate fibrous root coverage. Shrubs with deep, spreading root systems—such as native willows, dogwoods, and sumacs—anchor soil at greater depths. Trees can stabilize slopes but must be selected carefully; top-heavy species with shallow root plates can actually increase slide risk on steep slopes when wind loads are applied.
Establishing Vegetation on Steep Slopes
Planting on steep slopes presents a chicken-and-egg problem: you need vegetation to prevent erosion, but erosion prevents vegetation from establishing. The solution is temporary stabilization during the establishment period.
A proven establishment sequence for hillside plantings:
- Grade and prepare the slope surface, creating small horizontal benches or roughened texture to catch seeds and slow water.
- Install erosion control blankets over the entire slope surface.
- Seed with fast-establishing native grasses through the blankets (many ECBs come pre-seeded).
- Install container plants (shrubs and ground covers) through slits cut in the blankets at appropriate spacing.
- Irrigate lightly and frequently during establishment—heavy irrigation on slopes causes more harm than good.
- Avoid fertilizing heavily in the first season; excess nutrients wash downslope and can enter waterways.
Native species adapted to your local climate and soil conditions will always outperform exotic ornamentals for slope stabilization. They're adapted to local rainfall patterns, require less irrigation once established, and support the soil microbiome that contributes to aggregate stability.
Hydroseeding for Large Slopes
For large or inaccessible hillside areas, hydroseeding—spraying a slurry of seed, mulch, tackifier, and fertilizer—provides rapid, uniform coverage. The mulch component provides immediate erosion protection while seeds germinate. Hydroseeding is significantly less expensive than sod or container planting for large areas and can be applied to slopes too steep for conventional seeding equipment.
Hydroseeding works best when applied in two passes: a first pass of seed and fertilizer, followed by a second pass of bonded fiber matrix (BFM) mulch that creates a continuous erosion-resistant layer. BFM products can withstand rainfall intensities of 2 to 4 inches per hour during the germination period.
Structural Solutions for Severe Hillside Drainage
When surface drainage and vegetation aren't sufficient—on very steep slopes, in unstable soils, or where structures are at risk—engineered structural solutions become necessary.
Retaining Walls with Integrated Drainage
Retaining walls are the most common structural solution for hillside properties, but a retaining wall without proper drainage is a retaining wall that will eventually fail. Hydrostatic pressure from trapped water behind a wall can exceed the design loads and cause overturning, sliding, or structural collapse.
Every retaining wall on a hillside needs these drainage elements:
- Gravel backfill zone: A minimum 12-inch-wide column of clean, free-draining gravel immediately behind the wall face, extending from the base to within 12 inches of the top (the top layer should be compacted native soil to prevent surface water from entering the gravel zone directly).
- Perforated drain pipe: A 4-inch perforated pipe at the base of the gravel zone, sloped at 1% minimum toward a daylight outlet.
- Weep holes: For masonry or concrete walls, weep holes at 4- to 6-foot intervals along the base allow water to escape even if the drain pipe becomes clogged.
- Waterproofing membrane: Applied to the back face of the wall to prevent moisture migration through the wall material, which causes efflorescence, freeze-thaw damage, and aesthetic deterioration.
Soldier Pile Walls and Soil Nail Walls
For steep cuts or high-load applications, soldier pile walls (steel H-piles driven into the ground with lagging boards between them) and soil nail walls (reinforcing bars drilled and grouted into the slope face, covered with shotcrete) provide heavy-duty stabilization. These are engineered solutions requiring geotechnical investigation, structural design, and professional installation, but they can stabilize slopes that would be impossible to hold with conventional retaining walls.
Soil nail walls are particularly effective for hillside drainage because the shotcrete facing can incorporate strip drains and weep holes that manage groundwater while the nails provide structural reinforcement. They're also constructed from the top down, meaning they don't require excavation at the toe of the slope—a significant advantage on sites where toe excavation would undermine existing structures.
Drainage Channels and Downchutes
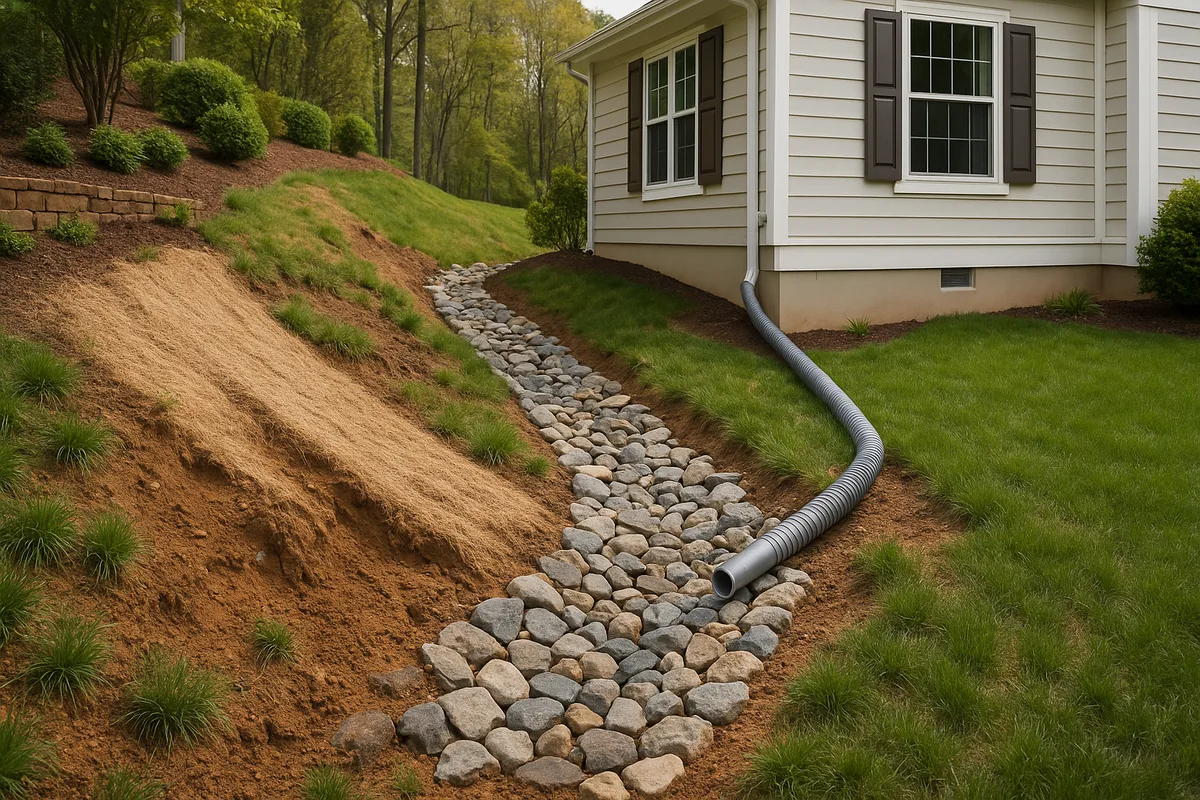
Where water must be conveyed down a steep slope—from a terrace drain to a lower discharge point, for example—lined drainage channels or downchutes prevent the concentrated flow from cutting into the hillside. These can be constructed from concrete, riprap, half-pipe sections, or flexible tubing, depending on flow volume and slope gradient.
Energy dissipation at the base of downchutes is critical. A common design uses a riprap-lined stilling basin or a concrete splash pad at the bottom to absorb the kinetic energy of the descending water before it enters the lower drainage system. Without energy dissipation, the concentrated flow at the base of a downchute will excavate a scour hole that undermines the chute itself and any nearby structures.
Stormwater Management and Regulatory Considerations
Hillside drainage doesn't exist in isolation. Water you redirect from your slope goes somewhere, and both physics and the law require you to consider where that somewhere is.
The Downstream Impact Principle
A fundamental principle of stormwater management is that you cannot increase the rate or concentrate the point of discharge onto neighboring properties. If your hillside drainage system collects diffuse sheet flow and pipes it to a single outlet at your property line, you've potentially created a liability. The water that previously spread across 200 feet of slope frontage is now a concentrated jet aimed at your neighbor's yard.
Proper design accounts for downstream impacts by:
- Maintaining pre-development flow patterns wherever possible.
- Using level spreaders at outlets to convert concentrated pipe flow back into diffuse sheet flow.
- Incorporating infiltration (dry wells, infiltration trenches, rain gardens) to reduce the total volume of runoff leaving the site.
- Providing detention (temporary storage) to reduce peak flow rates even if total volume remains the same.
Rainfall Intensity and Design Storms
Hillside drainage systems must be sized for the storms they'll face. Engineers use rainfall intensity-duration-frequency (IDF) data to determine design flows. The NOAA Atlas 14 provides precipitation frequency estimates for any location in the United States, allowing you to look up the expected rainfall intensity for various storm durations and return periods.
For residential hillside drainage, designing for the 10-year, 24-hour storm is a common minimum standard. In areas with high consequences of failure (structures at risk, steep unstable slopes), designing for the 25-year or even 100-year storm may be appropriate. Your local jurisdiction may specify the design storm in its stormwater management ordinance.
Permit Requirements
Hillside drainage work frequently triggers permit requirements. Common thresholds include:
- Grading permits: Required when moving more than a specified volume of soil (often 50 cubic yards) or when grading on slopes exceeding a certain gradient.
- Building permits: Required for retaining walls over 4 feet tall (measured from the bottom of the footing to the top of the wall).
- Stormwater permits: Required when disturbing more than a specified area of land (often 1 acre under federal NPDES rules, but many local jurisdictions have lower thresholds).
- Hillside development overlays: Many municipalities in hilly terrain have special overlay zones with additional requirements for drainage plans, geotechnical reports, and slope stability analysis.
Failure to obtain required permits can result in fines, stop-work orders, and—most importantly—the requirement to remove work that doesn't meet code. It's always cheaper to get the permit first.
Maintenance and Long-Term Performance
A hillside drainage system is only as good as its maintenance. Unlike flat-ground drainage that may function adequately with minimal attention, slope drainage systems are under constant assault from gravity, erosion, and sediment transport. Neglected systems don't just stop working—they can make problems worse by creating concentrated failure points.
Seasonal Inspection Protocol
Inspect your hillside drainage system at least twice a year—once before the rainy season and once after a major storm event. A thorough inspection covers:
- Inlet structures: Clear of debris, sediment, and vegetation that could block flow.
- Pipe outlets: Flowing freely, with no signs of scour or erosion at the discharge point.
- Swales and channels: Maintaining their designed cross-section, with no breaches in berms or accumulation of sediment that reduces capacity.
- Retaining wall weep holes: Draining freely. Blocked weep holes indicate a potential drainage failure behind the wall.
- Slope surface: No new rills, gullies, bare spots, or signs of soil movement.
- Vegetation: Healthy and providing adequate coverage. Dead zones need immediate replanting before erosion takes hold.
Sediment Management
Sediment is the inevitable byproduct of hillside erosion, and it will accumulate in your drainage system over time. Swales lose capacity as sediment fills them. French drain gravel becomes clogged with fines. Pipe inverts get buried. A proactive sediment management plan includes:
- Sediment traps at key points in the system—small basins designed to slow water and allow sediment to settle out before it enters pipes or critical channels.
- Cleanout access on all buried pipe runs, allowing periodic flushing with a garden hose or pressure washer.
- Annual swale reshaping to restore design grades and cross-sections.
- Filter fabric inspection where accessible—fabric that has become blinded (clogged with fines) may need replacement.
Adapting to Changing Conditions
Hillsides are dynamic environments. Trees grow and fall, soil creeps downslope, rainfall patterns shift, and upstream development changes the volume and timing of runoff reaching your property. A drainage system designed for today's conditions may be inadequate in 10 years. Monitor your system's performance over time and be prepared to add capacity, extend drains, or modify outlet structures as conditions evolve.
Climate change is increasing rainfall intensity in many regions, meaning storms are delivering more water in shorter periods. A system designed for the 10-year storm based on historical data may now be experiencing what would have been a 25-year event. When upgrading or expanding your system, consider using updated precipitation data and building in a safety factor to account for future intensity increases.
Bringing It All Together: A Systematic Approach to Hillside Drainage
Effective hillside drainage isn't about picking a single technique and hoping it works. It's about layering multiple strategies into an integrated system that addresses surface runoff, subsurface water, soil stability, and downstream impacts simultaneously. The most resilient hillside drainage systems combine interception at the top of the slope, terracing or velocity reduction across the middle, structural retention where needed, robust vegetation throughout, and carefully designed outlets at the bottom.
Start with a thorough assessment of your site conditions—slope gradient, soil type, water sources, and existing infrastructure. Design your system to handle the storms your region experiences, with a margin of safety for extreme events. Build in maintenance access from the beginning, because every component of a hillside drainage system will need attention over its lifetime. And when the slope is steep, the soil is unstable, or structures are at risk, invest in professional geotechnical and engineering expertise. The cost of proper slope erosion control design is a fraction of the cost of repairing a failed hillside.
Water will always flow downhill. Your job is to make sure it does so on your terms.
See Drainage Intelligence in Practice
Talk with our team or request an invitation to the platform.
Frequently Asked Questions
Install an interceptor drain (swale or French drain) across the slope above your home to capture and redirect sheet flow before it reaches your foundation. The drain should run perpendicular to the slope direction and discharge to a safe outlet like a storm drain, dry well, or natural drainage course. A minimum 2% grade along the drain ensures water flows to the outlet.
Deep-rooted native grasses and ground covers like creeping juniper, crown vetch, or native sedges are among the best options for slope erosion control. They establish quickly, require minimal maintenance, and their root systems bind soil particles together. For slopes steeper than 2:1, combine vegetation with erosion control blankets or turf reinforcement mats for immediate protection while plants establish.
Most riding mowers become unsafe on slopes steeper than 3:1 (roughly 33% or 18 degrees), while push mowers can handle slopes up to about 2:1 (50% or 26 degrees) with caution. Slopes steeper than 2:1 should be planted with low-maintenance ground cover, stabilized with retaining walls and terraces, or managed with erosion control blankets rather than turf grass.
Permit requirements vary by jurisdiction, but most municipalities require permits for grading that moves more than 50 cubic yards of soil, construction of retaining walls over 4 feet tall, or any work that alters natural drainage patterns affecting neighboring properties. Always check with your local building department before starting hillside drainage work, especially in areas with landslide or erosion hazard overlays.
Costs vary widely depending on scope. A simple French drain or interceptor swale may cost $2,000–$6,000, while comprehensive hillside drainage systems with retaining walls, terracing, and subsurface piping can range from $15,000 to $75,000 or more. Factors include slope steepness, soil type, accessibility for equipment, and whether structural engineering is required.
Yes, but it requires careful design. On steep slopes, French drains should follow contour lines across the slope rather than running straight downhill. The pipe gradient should stay between 1% and 5% to ensure water flows without causing erosion within the trench itself. Cleanouts should be installed at direction changes, and the outlet must discharge to an area that can handle concentrated flow without eroding.
Related Articles
Rain Gardens: Do They Actually Solve Drainage Problems?
How to Automate the Rational Method Formula for Residential Drainage Design