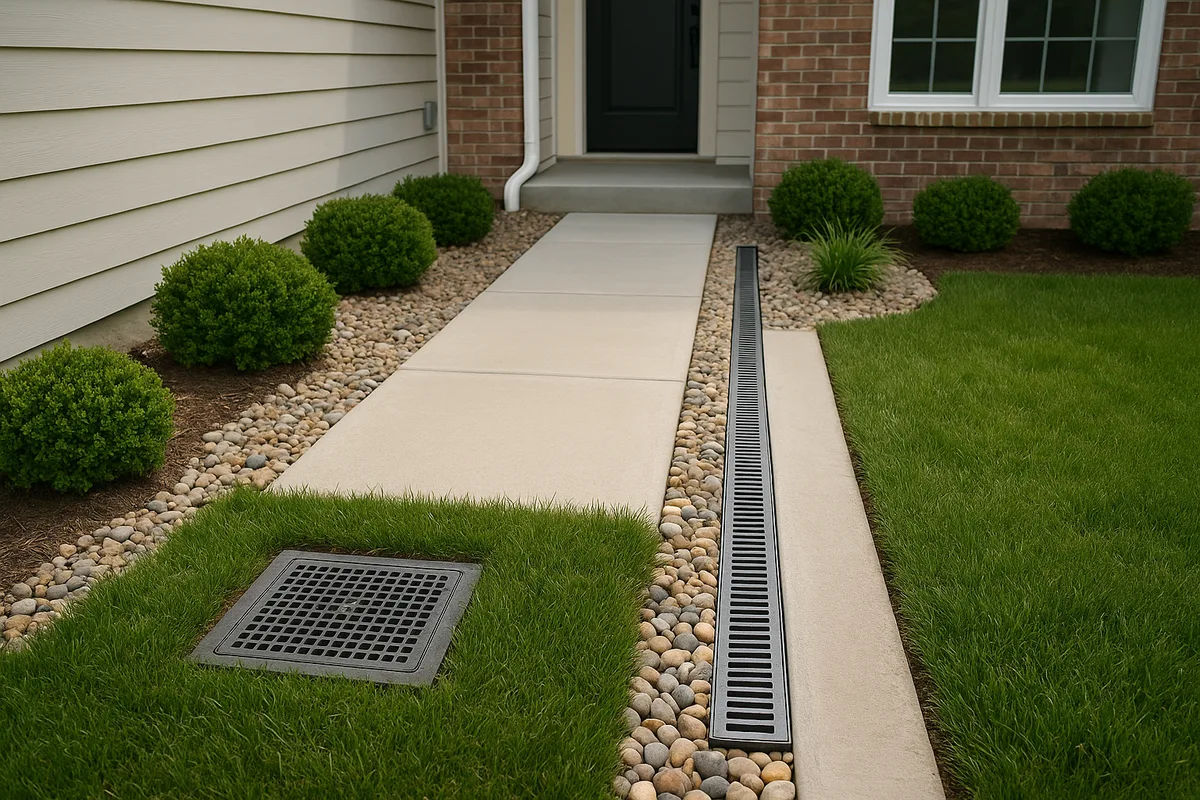
Catch Basins vs. Channel Drains: Choosing the Right Surface Drainage
When stormwater pools on your driveway, collects in a low corner of your yard, or sheets across your patio after every rain, the fix almost always comes down to two proven solutions: a catch basin or a channel drain. Both are surface drainage devices designed to intercept runoff before it causes damage — but they work in fundamentally different ways, they're suited to different site conditions, and choosing the wrong one can leave you with a system that underperforms or fails entirely.
Understanding the distinction between a catch basin and a channel drain (also commonly called a trench drain) is one of the most practical pieces of drainage knowledge a homeowner can have. In this guide, we'll break down how each system works, compare them across every metric that matters — capacity, cost, maintenance, aesthetics — and give you a clear framework for deciding which one belongs on your property.
How Catch Basins Work
A catch basin is a below-grade collection box — typically a square or round structure made of plastic, concrete, or brick — with a grated opening at the surface. Stormwater flows across the ground, drops through the grate into the basin, and is then routed away through an underground pipe connected to the basin's outlet. Think of it as a drain at the bottom of a sink: water has to travel to it, and once it arrives, it drops down and exits through a pipe.
Most residential catch basins range from 9 inches to 24 inches in diameter (or width, for square models), with depths of 18 to 36 inches. The basin itself serves multiple functions. First, it acts as a collection point, gathering water from the surrounding graded surface. Second, it functions as a sediment trap — debris, leaves, sand, and silt settle to the bottom of the basin before the water exits through the outlet pipe, which is positioned several inches above the basin floor. This sump area is a critical design feature that prevents downstream pipes from clogging.
Catch basins are point collection devices. They work best when the surrounding grade directs water toward a single low point. This is why you see them at the bottom of swales, in low corners of yards, at the base of slopes, and at intersections of driveways and walkways. The surrounding topography does most of the work — the catch basin simply provides a way for that concentrated water to leave the surface and enter a subsurface pipe network.
Key Components of a Catch Basin
A properly installed catch basin consists of several components working together. The grate sits at the surface and prevents large debris from entering while allowing water to pass through. Grates come in cast iron, galvanized steel, ductile iron, and high-density polyethylene, with load ratings ranging from pedestrian-only to H-20 (capable of supporting highway truck traffic). The basin body is the vertical structure below the grate, providing volume for water storage during peak flows and sediment collection at the bottom. The outlet pipe connects to the basin through a knockout or pre-formed opening, typically 3 to 6 inches in diameter for residential applications. Some basins also include an inlet pipe, allowing them to receive water from upstream catch basins or roof downspout connections.
The depth of the sump — the space below the outlet pipe's invert — matters more than most homeowners realize. A sump depth of at least 6 to 12 inches gives sediment a place to settle without blocking the outlet. Without adequate sump depth, debris passes directly into the pipe network, leading to blockages that are far more expensive to clear than simply cleaning out a basin.
Where Catch Basins Excel
Catch basins are the right choice when water naturally concentrates at a single point. Common residential applications include:
- Low spots in yards where water pools after rain
- Base of downspout discharge areas where roof runoff concentrates
- Intersections of swales or drainage channels
- Low corners of patios or driveways where two grades converge
- At the bottom of retaining walls where backfill drainage emerges
Because a catch basin is a single-point installation, it's often less expensive and less disruptive to install than a linear system. A single 12-inch catch basin with 20 feet of outlet pipe can be installed in a few hours by an experienced crew — or by a capable DIYer over a weekend.
How Channel Drains Work
A channel drain — also known as a trench drain, linear drain, or strip drain — takes a completely different approach. Instead of collecting water at a single point, it intercepts runoff along a continuous line. The system consists of a narrow, elongated trough (typically 4 to 12 inches wide) set into the ground with a grate on top. Water flows across the surface, hits the channel, drops through the grate, and is carried along the trough to an outlet point where it connects to a subsurface pipe.
The key advantage of a trench drain is its ability to intercept sheet flow — water that moves across a broad, relatively flat surface rather than concentrating into a stream or rivulet. When rain falls on a wide driveway, a patio, or a pool deck, the runoff doesn't naturally funnel to a single point. It spreads out. A channel drain placed perpendicular to the flow direction catches all of that water along its entire length, acting like a dam that captures runoff before it reaches areas you want to keep dry.
Channel drain systems are modular. Most residential products come in sections of 39 inches (1 meter) or 48 inches that snap or connect together, allowing you to build a drain run of any length. The channel body is typically made of polymer concrete, high-density polyethylene (HDPE), fiberglass, or poured-in-place concrete. Grates are available in a wide range of materials and styles, from simple galvanized steel bar grates to decorative cast iron patterns and ADA-compliant slotted designs.
Channel Drain Design Considerations
The hydraulic design of a channel drain involves more variables than a catch basin. The channel must be sized to carry the peak flow rate from the contributing drainage area, and because water enters along the entire length of the channel, the flow rate increases from the upstream end to the downstream end. This means the downstream sections handle significantly more water than the upstream sections.
To manage this, many channel drain systems are available in sloped-bottom configurations, where the internal channel depth increases progressively from the upstream end to the outlet. This built-in slope (typically 0.5% to 1%) ensures that water moves efficiently toward the outlet even when the surface above is flat. Alternatively, neutral (flat-bottom) channels can be used when the surface itself provides adequate slope.
Channel width and depth determine the system's flow capacity. A standard 4-inch-wide residential channel drain can handle approximately 15 to 30 gallons per minute per linear foot, depending on the slope. For most residential applications — driveways, patios, pool decks — a 4- to 6-inch-wide channel is sufficient. Wider channels (8 to 12 inches) are reserved for commercial applications or areas with exceptionally high flow volumes.
Where Channel Drains Excel
Channel drains are the right choice when you need to intercept water across a wide front. Common residential applications include:
- Driveway-to-garage transitions where a sloped driveway meets a garage floor
- Patio and pool deck edges where runoff would otherwise flow toward the house
- At the base of slopes where sheet flow needs to be captured before it crosses a walkway or enters a structure
- Along property boundaries where runoff from an adjacent property needs to be intercepted
- Across the threshold of a walkout basement or below-grade entry
The garage-door application is perhaps the most iconic use of a channel drain in residential construction. A trench drain installed just outside the garage door captures driveway runoff before it enters the garage — a critical function in climates where rain, snowmelt, or ice create persistent water intrusion problems.
Head-to-Head Comparison: Performance Metrics
Choosing between a catch basin and a channel drain requires evaluating your specific site conditions against the strengths of each system. Here's how they compare across the metrics that matter most.
Flow Interception Efficiency
A channel drain intercepts water along its entire length, making it far more efficient at capturing sheet flow across wide surfaces. A catch basin, by contrast, relies on the surrounding grade to funnel water to a single point. If the grading isn't precise — or if the surface is too flat to direct flow effectively — water will bypass the catch basin entirely. For surfaces wider than about 10 feet, a channel drain will almost always outperform a catch basin in interception efficiency.
However, a catch basin excels when water is already concentrated. If a swale, valley, or graded surface naturally funnels water to a low point, a catch basin captures that concentrated flow with minimal infrastructure. Trying to use a channel drain in this scenario would be overkill — more expensive and no more effective.
Volume Capacity and Peak Flow Handling
Catch basins have a built-in advantage in peak flow handling because of their internal volume. A 24-inch-square catch basin that's 36 inches deep holds roughly 45 gallons of water. During intense, short-duration storms, this storage volume acts as a buffer — the basin fills up and slowly releases water through the outlet pipe, attenuating the peak flow. This is particularly valuable when the outlet pipe's capacity is limited.
Channel drains have minimal internal storage. They're designed to keep water moving, not to store it. If the outlet pipe can't keep up with the inflow rate, a channel drain will surcharge — water will back up in the channel and eventually overflow the grate. For this reason, channel drain systems require careful sizing of both the channel and the outlet pipe to match the design storm event.
Debris and Sediment Management
Catch basins are inherently better at trapping sediment and debris because of their sump design. The sump area below the outlet pipe collects sand, silt, leaves, and other material, preventing it from entering the pipe network. This makes catch basins a form of pre-treatment for stormwater — a feature that's increasingly important as municipalities tighten stormwater quality regulations.
Channel drains are more susceptible to debris accumulation. Leaves, mulch, grass clippings, and sediment can build up inside the channel, reducing its capacity and eventually blocking flow. The narrow, linear design makes cleaning more labor-intensive than scooping out a catch basin. Many channel drain manufacturers address this with removable grate sections, but regular maintenance is still essential.
Installation Complexity
A single catch basin is one of the simpler drainage installations a homeowner or contractor can undertake. Dig a hole, set the basin, connect the outlet pipe, backfill, and ensure the surrounding grade slopes toward the grate. The critical skill is getting the elevation right — the grate must sit at or slightly below the surrounding grade to capture water effectively.
Channel drain installation is more demanding. The channel must be set in a concrete or compacted aggregate bed, leveled precisely along its entire length (or set to a consistent slope), and connected to an outlet. In existing concrete or asphalt surfaces, installation requires saw-cutting a trench — a process that generates significant dust and noise and requires specialized equipment. The modular sections must be aligned and sealed to prevent leaks between joints. For driveways and other vehicular surfaces, the concrete haunch supporting the channel must be thick enough to handle wheel loads without cracking.
Cost Analysis: Materials, Labor, and Lifetime Value
Cost is often the deciding factor for homeowners, and the two systems differ significantly in both upfront and long-term expenses.
Upfront Material Costs
A basic residential catch basin (12-inch round or square, HDPE construction, with a flat grate) costs between $30 and $80 for the basin and grate alone. A larger 24-inch basin with a cast iron grate runs $100 to $300. Add 20 to 50 feet of 4-inch corrugated or SDR-35 pipe at $1 to $4 per foot, fittings, and gravel, and the total material cost for a single catch basin installation typically falls between $100 and $500.
Channel drain systems are priced per linear foot. A basic polymer channel with a plastic grate costs $8 to $15 per linear foot. Mid-range polymer concrete channels with galvanized steel grates run $20 to $40 per linear foot. High-end systems with cast iron or stainless steel grates can exceed $60 per linear foot. A typical 15-foot driveway channel drain installation requires $120 to $600 in channel and grate materials, plus outlet pipe, end caps, fittings, and concrete for the haunch — bringing the total material cost to $200 to $900.
Labor and Installation Costs
Professional installation of a catch basin typically costs $500 to $2,000, depending on depth, pipe run length, soil conditions, and whether existing hardscape must be cut or removed. A straightforward installation in an open yard is at the lower end; a catch basin in an existing concrete patio with a long pipe run to daylight is at the higher end.
Channel drain installation runs $50 to $150 per linear foot when professionally installed, with the wide range reflecting differences in surface type (new concrete vs. retrofit in existing concrete), channel quality, and site access. A 15-foot driveway channel drain retrofit — including saw-cutting, excavation, concrete work, channel installation, and pipe connection — typically costs $1,200 to $3,000.
Long-Term Maintenance Costs
Catch basins require periodic cleaning — typically once or twice per year, or after major storms. Cleaning involves removing the grate, scooping out accumulated sediment and debris, and inspecting the outlet pipe for blockages. Most homeowners can do this themselves in 15 to 30 minutes. Professional catch basin cleaning costs $75 to $200 per basin.
Channel drains require more frequent attention. Grates should be cleared of surface debris after storms, and the channel interior should be flushed with a hose quarterly or as needed. Over time, sediment can harden in the channel bottom, requiring scraping or pressure washing. The removable grate sections make this possible but not effortless. Professional channel drain cleaning costs $100 to $300 per service, depending on length and condition.
Site Assessment: How to Determine Which System You Need
The right drainage solution depends on your site's topography, the nature of the water problem, and the physical characteristics of the area you're draining. Here's a systematic approach to making the decision.
Step 1: Identify the Flow Pattern
Go outside during a moderate rain and observe how water moves across the problem area. You're looking for one of two patterns:
- Concentrated flow: Water funnels into a stream, rivulet, or defined path and collects at a specific low point. This pattern indicates a catch basin solution.
- Sheet flow: Water moves as a broad, shallow sheet across a wide surface without concentrating into a defined channel. This pattern indicates a channel drain solution.
If you can't observe during rain, look for physical evidence. Erosion channels, sediment deposits in a fan pattern, and water stains on hardscape surfaces all tell the story of how water moves. Topographic data — even from a simple laser level or a smartphone-based elevation tool — can reveal subtle grade changes that dictate flow direction.
Step 2: Evaluate the Contributing Drainage Area
The size of the area draining to your problem spot determines the volume of water the system must handle. For a catch basin, measure the area of ground that slopes toward the intended basin location. For a channel drain, measure the area upslope of the intended channel location.
A useful rule of thumb: for every 1,000 square feet of impervious surface (roof, driveway, patio), expect approximately 620 gallons of runoff per inch of rainfall. For pervious surfaces (lawn, garden beds), the runoff volume depends on soil type and saturation but typically ranges from 150 to 450 gallons per 1,000 square feet per inch of rainfall. These figures help you size the system appropriately — and they often reveal that the volume is larger than homeowners expect.
You can look up local rainfall intensity data using NOAA Atlas 14, which provides precipitation frequency estimates for any location in the United States. For residential drainage design, the 10-year, 1-hour storm event is a common design standard — meaning the system should handle the rainfall intensity expected to occur once every 10 years, sustained for one hour.
Step 3: Assess the Outlet Options
Both catch basins and channel drains need somewhere to send the water they collect. The outlet pipe must have adequate slope (minimum 1% or 1/8 inch per foot) and must discharge to an approved location — typically a storm sewer, a drainage easement, a rain garden, a dry well, or daylight at a lower elevation on your property.
If your outlet options are limited — for example, if the only available discharge point is far away or at a higher elevation — a catch basin's built-in storage volume becomes more valuable. It can buffer peak flows and reduce the required pipe capacity. A channel drain in the same situation would need a larger outlet pipe or a downstream detention structure to avoid surcharging.
Step 4: Consider the Surface Material
The surface you're draining affects both the choice of system and the installation approach:
- Lawn or landscaped areas: Catch basins are typically easier and less expensive to install. Channel drains are uncommon in lawn areas unless intercepting flow at the edge of a hardscape surface.
- Concrete driveways and patios: Channel drains are the standard solution for intercepting sheet flow. Catch basins work if the concrete is already graded to a low point. Retrofitting either system requires saw-cutting.
- Paver patios and walkways: Both systems work well. Pavers can be removed and reset around a catch basin or channel drain without saw-cutting. This makes paver surfaces the easiest to retrofit.
- Asphalt driveways: Channel drains can be installed during asphalt paving or retrofit with saw-cutting. Catch basins are common at low points in asphalt surfaces.
Combining Both Systems for Complete Drainage
In many residential situations, the best drainage design uses both catch basins and channel drains as complementary components of an integrated system. This isn't an either-or decision — it's a question of which tool goes where.
A common configuration uses a channel drain across a driveway to intercept sheet flow, with the channel's outlet pipe routing to a catch basin in the adjacent yard. The catch basin serves as a junction point and sediment trap before the water continues through a pipe to its final discharge location. This combined approach leverages the channel drain's interception efficiency and the catch basin's storage and sediment management capabilities.
Another common design places catch basins at low points in the yard — at the bottom of swales, at downspout discharge points — and connects them with underground pipes to a main trunk line. A channel drain at the patio edge or garage threshold feeds into the same pipe network. The result is a comprehensive surface drainage system that handles both concentrated and sheet flow patterns.
Design Principles for Combined Systems
When combining catch basins and channel drains, follow these design principles:
- Maintain minimum pipe slopes: All connecting pipes should slope at least 1% (1/8 inch per foot) toward the outlet. Steeper is better — 2% is ideal for residential systems.
- Size pipes for cumulative flow: Each downstream pipe segment must handle the combined flow from all upstream connections. A 4-inch pipe is adequate for most single-source connections, but trunk lines serving multiple catch basins or a long channel drain may require 6-inch pipe.
- Use catch basins as junction points: Whenever pipes change direction or multiple pipes converge, install a catch basin at the junction. This provides access for maintenance and prevents debris from accumulating at pipe fittings.
- Place cleanouts at regular intervals: For pipe runs longer than 50 feet without a catch basin, install a cleanout fitting to allow future maintenance access.
- Ensure adequate cover over pipes: Underground pipes should have at least 6 to 12 inches of soil cover in lawn areas and at least 12 inches under vehicular surfaces to prevent crushing.
Common Mistakes and How to Avoid Them
Drainage installations fail for predictable reasons. Understanding these common mistakes helps you avoid them whether you're doing the work yourself or evaluating a contractor's proposal.
Mistake 1: Insufficient Slope to the Catch Basin
A catch basin only works if water can reach it. The surrounding grade must slope toward the basin at a minimum of 2% (1/4 inch per foot). On hardscape surfaces, 1% may be acceptable if the surface is smooth and uniform. Homeowners often install a catch basin at what they perceive to be the low point, only to discover that subtle grade variations prevent water from reaching it. Always verify grades with a level or transit before committing to a basin location.
Mistake 2: Undersizing the Channel Drain
A 4-inch-wide channel drain is adequate for most residential patios and walkways, but a wide driveway with a steep slope can generate flow rates that overwhelm a small channel. When in doubt, size up. A 6-inch channel costs marginally more than a 4-inch channel but handles significantly more flow. Also, ensure the outlet pipe is large enough — a 4-inch outlet on a 20-foot channel drain is often the bottleneck that causes surcharging.
Mistake 3: Ignoring the Outlet
The most beautifully installed catch basin or channel drain is useless if the outlet pipe doesn't go anywhere useful. Water must be conveyed to a point where it can be safely released without causing erosion, flooding a neighbor's property, or violating local stormwater regulations. Before installing any drainage system, plan the entire route from collection point to discharge point.
Mistake 4: Neglecting Maintenance
Both systems require ongoing maintenance. A catch basin with 12 inches of accumulated sediment in its sump is effectively a clogged drain. A channel drain with leaves packed against the grate can't intercept any water at all. Establish a maintenance schedule — inspect and clean catch basins at least twice per year (spring and fall), and clear channel drain grates after every significant storm.
Mistake 5: Wrong System for the Problem
Installing a catch basin where a channel drain is needed — or vice versa — is surprisingly common. A single catch basin in the middle of a 30-foot-wide driveway won't intercept sheet flow effectively; you'd need the entire driveway graded to that point, which is often impractical. Similarly, a channel drain across a narrow swale where water is already concentrated is an expensive solution to a problem a $50 catch basin could solve.
Making Your Decision: A Practical Framework
To simplify the decision, use this framework based on your specific situation:
Choose a catch basin when:
- Water naturally concentrates at a single low point
- You're collecting water from a swale, downspout, or defined drainage path
- You need sediment and debris trapping before water enters a pipe network
- You want a junction point in a larger drainage pipe system
- Budget is limited and the collection area is small
Choose a channel drain when:
- Water flows as a broad sheet across a wide surface
- You need to intercept flow along a line (driveway edge, patio perimeter, garage threshold)
- The surface grade doesn't naturally funnel water to a single point
- You're protecting a structure from surface runoff crossing a hardscape surface
- Aesthetic integration with the hardscape is important
Use both when:
- Your property has multiple drainage challenges (both concentrated and sheet flow)
- You're building a comprehensive drainage system with multiple collection points
- A channel drain's outlet needs a sediment trap before connecting to the main pipe run
- You want redundancy and maximum interception across different areas of the property
The most important step in choosing the right surface drainage solution is understanding how water actually moves across your property. Topographic data — even basic elevation information — transforms drainage decisions from guesswork into engineering. At Low Point Labs, we specialize in providing homeowners and contractors with precise topographic drainage intelligence that reveals exactly where water flows, where it collects, and where it needs to go. Before you invest in catch basins, channel drains, or any drainage infrastructure, explore our drainage assessment services to ensure your solution matches your property's unique topography.
See Drainage Intelligence in Practice
Talk with our team or request an invitation to the platform.
Frequently Asked Questions
A catch basin is a below-grade box with a grate that collects water at a single low point, while a channel drain (also called a trench drain) is a long, narrow trough with a grate that intercepts water along a continuous line. Catch basins work best for concentrated flow; channel drains are designed to capture sheet flow across wide surfaces like driveways and patios.
Professional installation of a channel drain in an existing driveway typically costs $1,200 to $3,000 for a 15-foot run, including saw-cutting, excavation, concrete work, the channel and grate, and outlet pipe connection. Material costs alone range from $200 to $900 depending on the channel quality and grate material.
Residential catch basins should be inspected and cleaned at least twice per year — ideally in spring and fall. If your property has heavy tree cover or the basin collects significant sediment, quarterly cleaning may be necessary. The sump should never be more than one-third full of accumulated debris.
A single catch basin in a lawn area is a manageable DIY project for homeowners with basic excavation skills. Channel drains are more challenging, especially in existing concrete or asphalt, because they require precise leveling, saw-cutting, and concrete work. Retrofitting a channel drain in hardscape is generally best left to a professional.
Permit requirements vary by municipality. Many jurisdictions don't require permits for small residential drainage installations, but some require permits if you're connecting to a public storm sewer, altering drainage patterns that affect neighboring properties, or working within a floodplain or easement. Always check with your local building or public works department before starting work.
Yes, combining both systems is a common and effective approach. A typical configuration uses a channel drain to intercept sheet flow across a driveway or patio, with the channel's outlet pipe routing to a catch basin that serves as a junction point and sediment trap before water continues to its final discharge location.
Related Articles
Rain Gardens: Do They Actually Solve Drainage Problems?
Dry Wells Explained: When They Work and When They Fail