Crawl Space Water: Causes, Risks, and Permanent Fixes for Homeowners
Water in a crawl space is one of the most common — and most underestimated — threats to a home's structural integrity, indoor air quality, and long-term value. Roughly 20% of U.S. homes are built on crawl space foundations, and studies suggest that more than half of those spaces experience some degree of moisture intrusion during their lifetime. Whether it shows up as standing puddles after a rainstorm, persistent dampness on the ground, or condensation dripping from floor joists, water in your crawl space demands attention before it escalates into a far more expensive problem.
Effective crawl space drainage is not a single product or a weekend DIY project — it's a system-level solution that addresses the root causes of water entry, manages the water that does arrive, and controls the moisture environment beneath your home. In this guide, we'll walk through the mechanics of how water gets into crawl spaces, the cascading risks it creates, how to diagnose the source, and the permanent fixes that actually work.
How Water Gets Into Your Crawl Space
Understanding the pathways water uses to reach your crawl space is the essential first step toward solving the problem. Water doesn't appear randomly — it follows predictable physical principles, and identifying the mechanism tells you which fix will actually work.
Surface Water and Poor Grading
The most common source of water in a crawl space is surface runoff that flows toward the foundation rather than away from it. The International Residential Code (IRC) specifies that the ground should slope away from the foundation at a minimum grade of 6 inches over the first 10 feet. When this slope is insufficient, reversed, or has been altered by landscaping, settling, or additions, rainwater and snowmelt pool against the foundation wall and seep through cracks, joints, or porous concrete.
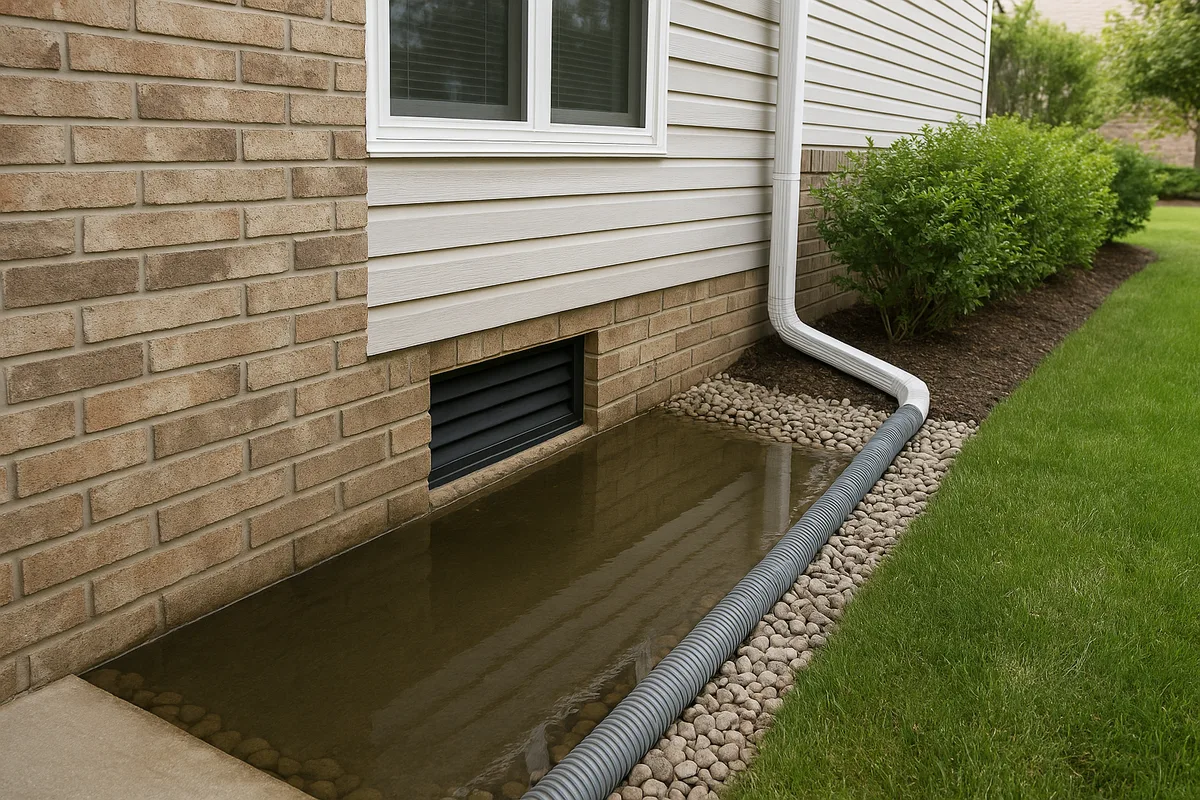
Gutter downspouts that discharge directly at the foundation base are a particularly frequent culprit. A single 1,000-square-foot roof section can shed over 600 gallons of water during a one-inch rainfall event. When that volume is concentrated at a single discharge point next to the crawl space wall, hydrostatic pressure drives water through any available opening.
Groundwater and High Water Tables
In areas with high water tables or seasonal groundwater fluctuations, water can enter the crawl space from below — rising up through the soil floor or seeping through the bottom of foundation walls. This is especially common in low-lying areas, near rivers or wetlands, and in regions with clay-heavy soils that impede natural drainage. The NRCS Web Soil Survey is an excellent resource for checking the hydrologic soil group and seasonal high water table depth for your property. Soils classified as Group D (high clay content, very slow infiltration) are particularly prone to causing groundwater-related crawl space moisture.
Groundwater intrusion is often the most difficult source to address because you can't simply redirect it at the surface. It requires subsurface drainage systems that intercept and remove water before it reaches the crawl space floor.
Condensation and Humidity
Not all crawl space water comes from liquid intrusion. In warm, humid climates — and even in moderate climates during summer months — warm, moist outdoor air enters the crawl space through foundation vents, gaps, and openings. When this air contacts cooler surfaces like foundation walls, metal ductwork, and floor joists, it condenses. Over time, this condensation can produce enough moisture to drip, pool, and saturate organic materials.
This phenomenon is particularly insidious because the crawl space may appear "dry" in terms of liquid water entry, yet the relative humidity can consistently exceed 70-80%, creating conditions that are functionally identical to having standing water in terms of mold growth and wood decay.
Plumbing Leaks
Crawl spaces frequently house supply lines, drain lines, water heaters, and HVAC condensate lines. Slow leaks from any of these sources can introduce water that accumulates unnoticed for months or years. A supply line pinhole leak delivering just one drip per second produces roughly 5 gallons of water per day — over 1,800 gallons per year. Because crawl spaces are rarely inspected, these leaks often go undetected until secondary damage becomes visible on the floors above.
The Cascading Risks of Water in Your Crawl Space
Water in a crawl space is never a cosmetic issue. It triggers a chain of consequences that compound over time, affecting everything from the air your family breathes to the structural capacity of your home's framing.
Structural Damage and Wood Decay
Wood framing members — floor joists, rim joists, sill plates, and subflooring — are the most immediately threatened components. When wood moisture content exceeds 20%, conditions become favorable for wood-decay fungi. At sustained moisture levels above 28%, active rot can progress rapidly, compromising the load-bearing capacity of structural members. Sill plates, which sit directly on the foundation wall and are often in contact with moisture, are typically the first to deteriorate.
Beyond rot, sustained moisture causes wood to swell, warp, and delaminate. Homeowners may notice sagging or bouncy floors, doors that no longer close properly, or cracks appearing in drywall — all symptoms that can be traced back to moisture-damaged framing beneath the first floor.
Mold, Mildew, and Indoor Air Quality
The stack effect — the natural upward movement of air through a building — means that 40-50% of the air on your first floor originates from the crawl space. When that space harbors mold, mildew, or bacterial growth, spores and volatile organic compounds are carried directly into the living environment. Common crawl space mold species include Aspergillus, Penicillium, Cladosporium, and in severe cases, Stachybotrys chartarum (black mold).
For occupants with allergies, asthma, or compromised immune systems, contaminated crawl space air can trigger or worsen respiratory symptoms. Even for healthy individuals, chronic exposure to elevated mold spore counts is associated with upper respiratory irritation and increased susceptibility to infection.
Pest Infestation
A wet crawl space is an open invitation to pests. Termites — particularly subterranean species — require moisture to survive and are drawn to damp wood. A chronically wet crawl space can support active termite colonies that cause tens of thousands of dollars in structural damage before being detected. Mosquitoes breed in standing water, rodents seek out the stable temperature and humidity, and various insects including cockroaches, silverfish, and carpenter ants thrive in moist environments.
Insulation Failure and Energy Loss
Fiberglass batt insulation, commonly installed between floor joists in vented crawl spaces, absorbs moisture readily. Once saturated, it loses virtually all of its insulating value and sags or falls from the joist bays entirely. The result is a significant increase in heating and cooling costs, cold floors in winter, and an HVAC system that works harder to maintain comfortable temperatures. In severe cases, wet insulation becomes a reservoir for mold growth and must be completely removed and replaced.
Foundation Deterioration
Chronic moisture exposure degrades foundation materials over time. Concrete, while durable, is porous — water infiltration carries dissolved minerals that can cause efflorescence (white crystalline deposits), spalling (surface flaking), and eventual erosion of the concrete matrix. For block foundations, water that enters the hollow cores can freeze in winter, causing cracking and displacement. Mortar joints in block and brick foundations are particularly vulnerable to moisture-driven deterioration.
Diagnosing the Source: Where Is the Water Coming From?
Before investing in any crawl space drainage solution, you need to correctly identify the water source. Applying the wrong fix — for example, installing a dehumidifier when the problem is surface water intrusion — wastes money and leaves the underlying issue unresolved.
Visual Inspection Techniques
Start with a thorough visual inspection during or immediately after a heavy rain event. Enter the crawl space (with proper safety precautions including a respirator, eye protection, and appropriate clothing) and look for:
- Active water entry points: Water streaming through wall cracks, pipe penetrations, or the wall-floor joint
- Water staining patterns: Horizontal tide marks on walls indicate past water levels; vertical streaks suggest water running down from above
- Standing water distribution: Water concentrated near one wall suggests surface drainage issues on that side; uniform water across the floor suggests groundwater
- Condensation: Droplets on ductwork, pipes, or the underside of the subfloor indicate a humidity problem rather than liquid intrusion
The Plastic Sheet Test
To distinguish between groundwater rising through the soil and condensation from humid air, tape a 2-foot-square piece of clear plastic sheeting flat against the crawl space floor, sealing all edges with tape. Leave it for 48-72 hours. If moisture accumulates on the underside of the plastic (between the plastic and the soil), groundwater or soil moisture is migrating upward. If moisture appears on the top surface, the source is airborne humidity condensing on the cooler ground.
Exterior Assessment
Walk the exterior perimeter and assess:
- Grade slope: Use a 10-foot straightedge or a laser level to verify the ground slopes away from the foundation at the required minimum
- Gutter condition: Check for overflowing, leaking, or disconnected gutters and downspouts
- Downspout discharge: Verify that downspouts extend at least 4-6 feet from the foundation, preferably further
- Window wells and bulkhead doors: These are common water entry points when improperly sealed or drained
- Hardscape grading: Patios, driveways, and walkways that have settled and now slope toward the house
Plumbing Audit
Inspect all visible plumbing in the crawl space. Look for green corrosion on copper fittings, white mineral deposits at joints, damp spots on drain lines, and moisture around water heater connections and HVAC condensate lines. Turn on various fixtures in the house while an observer watches the crawl space plumbing for drips.
Exterior Solutions: Stopping Water Before It Arrives
The most effective and cost-efficient approach to crawl space drainage begins outside the house. Every gallon of water you divert before it reaches the foundation is a gallon you don't have to manage inside the crawl space.
Regrading and Surface Drainage
Correcting the grade around your foundation is often the single most impactful improvement you can make. The goal is to establish a consistent slope of at least 6 inches of fall over the first 10 feet from the foundation wall in all directions. This may require importing fill soil (use clean, compactable fill — not topsoil, which is too porous), building up flower beds, or regrading swales and drainage channels.
For properties where regrading alone is insufficient — such as those at the base of a hill or in a natural drainage path — surface drainage features like swales, berms, and catch basins can intercept and redirect sheet flow before it reaches the foundation. A properly graded swale with a 1-2% longitudinal slope can handle substantial runoff volumes without requiring any mechanical components.
Gutter and Downspout Optimization
Your roof drainage system is the first line of defense. Ensure gutters are sized appropriately (5-inch K-style gutters are standard for most residential roofs, but 6-inch may be needed for steep or large roof areas), cleaned regularly, and free of leaks. Downspouts should discharge into solid pipe extensions that carry water at least 6 feet from the foundation — 10 feet or more is preferable. Underground downspout drains that daylight to a lower area of the yard are the gold standard, as they move water far from the structure without creating surface erosion.
Exterior French Drains and Curtain Drains
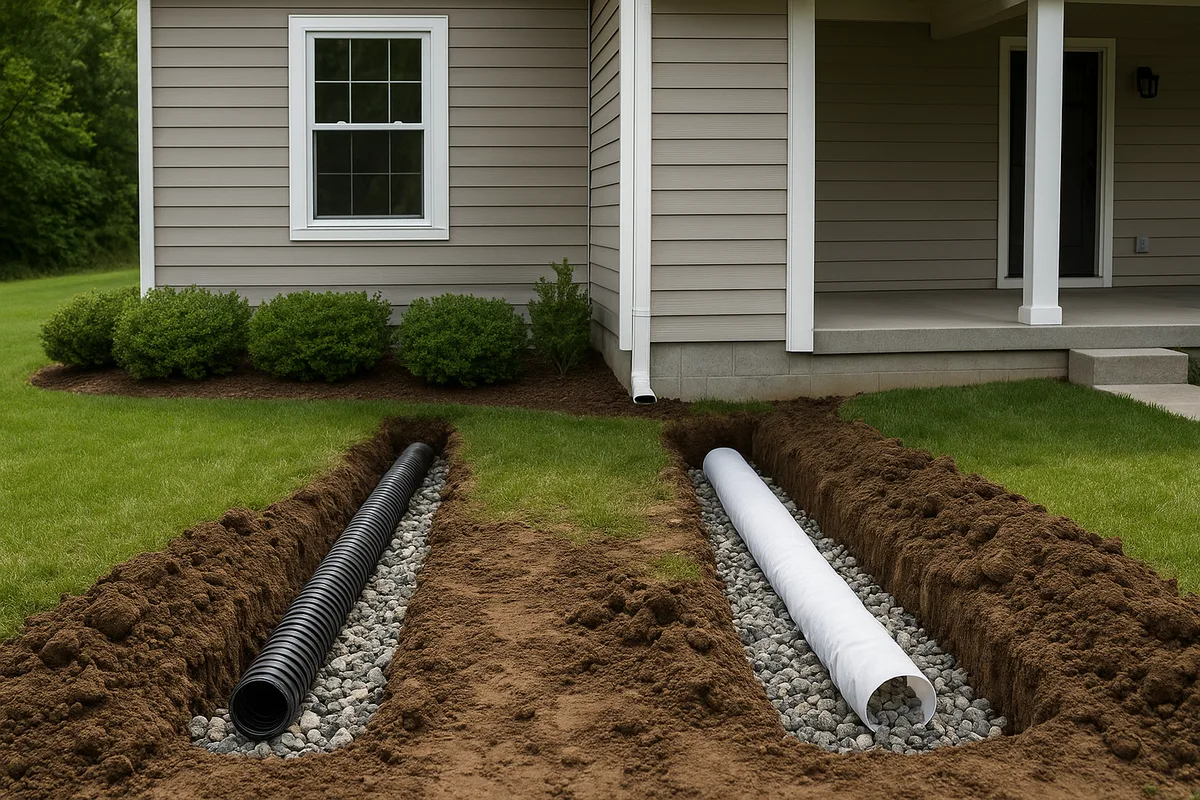
When subsurface water flows laterally toward the foundation — common on sloped lots — an exterior curtain drain (sometimes called an interceptor drain) installed uphill from the foundation can capture groundwater before it reaches the crawl space. This consists of a perforated pipe bedded in gravel within a filter-fabric-lined trench, typically installed 18-24 inches deep. The pipe is sloped at a minimum 1% grade to a suitable discharge point downhill.
Exterior footing drains, installed at the base of the foundation wall alongside the footing, are the most comprehensive exterior solution. They intercept water at the lowest point of the foundation and drain it away by gravity or to a sump. However, installing exterior footing drains on an existing home requires excavating down to the footing — a significant and costly undertaking that may not be practical for all properties.
Interior Crawl Space Drainage Systems
When exterior solutions alone cannot fully control water entry — particularly in cases of high water tables, hydrostatic pressure, or properties where exterior excavation is impractical — interior crawl space drainage systems provide a reliable secondary line of defense.
Interior French Drain Systems
An interior French drain (sometimes called a perimeter drain or drain tile system) is installed inside the crawl space along the interior base of the foundation walls. The system typically consists of a trench cut into the crawl space floor, lined with gravel, and containing a perforated pipe (usually 3-inch or 4-inch schedule 40 PVC or corrugated HDPE) that collects water infiltrating through the walls or rising from the soil. The pipe is sloped toward a collection point — usually a sump basin.
For optimal performance, the trench should be at least 12 inches wide and deep enough to place the pipe at or slightly below the bottom of the footing. A layer of washed gravel (typically #57 stone) surrounds the pipe, and filter fabric prevents soil migration into the gravel bed. The trench is then covered with additional gravel, leaving the surface accessible for inspection.
Sump Pump Installation
In most crawl space drainage configurations, collected water flows by gravity to a sump basin — a pit (typically 18-24 inches in diameter and 24-30 inches deep) set into the crawl space floor at the lowest point. A submersible sump pump activates automatically via a float switch when water reaches a preset level, pumping it through a solid discharge line to a point well away from the foundation.
Critical sump pump specifications for crawl space applications include:
- Pump capacity: Sized to handle the expected flow rate, typically 1/3 to 1/2 horsepower for residential applications
- Check valve: Prevents pumped water from flowing back into the basin when the pump cycles off
- Discharge line: Solid (non-perforated) PVC, minimum 1.5-inch diameter, routed to discharge at least 10-15 feet from the foundation
- Battery backup or water-powered backup: Essential for power outages, which often coincide with heavy storms — exactly when the pump is needed most
- Alarm system: An audible or connected alarm that alerts homeowners if the water level rises above the pump activation point
A sump pump is a mechanical device with a finite lifespan. Most quality submersible pumps last 7-10 years with proper maintenance. Annual testing, cleaning the basin of debris, and verifying float switch operation are essential maintenance tasks.
Gravity Drainage
For crawl spaces where the exterior grade permits, gravity drainage is preferable to a pump-dependent system. If the crawl space floor is above the grade of the yard at some point, a solid drain pipe can exit through the foundation wall and daylight to a lower area. Gravity systems have no moving parts, require no electricity, and don't fail during power outages. Where site conditions allow, this is always the preferred approach.
Crawl Space Encapsulation: The Comprehensive Solution
Encapsulation represents the most thorough approach to crawl space moisture management. Rather than simply removing water that enters, encapsulation creates a controlled environment that prevents moisture from entering in the first place.
What Encapsulation Involves
A full crawl space encapsulation system typically includes the following components:
Vapor barrier: A heavy-duty polyethylene or reinforced liner (minimum 12-mil thickness, though 20-mil is preferred for durability) installed across the entire crawl space floor and extending up the foundation walls to just below the sill plate. All seams are overlapped 6-12 inches and sealed with specialized tape or adhesive. The barrier is mechanically fastened to the walls.
Sealed foundation vents: All existing foundation vents are permanently closed and sealed. This is a critical step — open vents in humid climates introduce more moisture than they remove, contradicting the outdated ventilation theory that building codes held for decades. Modern building science and updated code provisions (IRC Section R408.3) now explicitly permit and even encourage sealed, conditioned crawl spaces.
Drainage system: A perimeter French drain and/or sump pump system to handle any water that does penetrate the foundation, installed beneath the vapor barrier.
Dehumidification: A commercial-grade crawl space dehumidifier sized for the volume of the space, maintaining relative humidity at or below 55%. Residential dehumidifiers are not appropriate — they lack the capacity, durability, and drainage features needed for crawl space environments.
Conditioning: The crawl space is connected to the home's HVAC system via supply and return registers, or conditioned solely by the dehumidifier, maintaining a controlled temperature and humidity environment year-round.
Why Encapsulation Works
Encapsulation addresses all three moisture pathways simultaneously. The vapor barrier stops soil moisture evaporation (which can contribute 10-15 gallons of water vapor per day in a 1,000-square-foot crawl space). Sealed vents eliminate humid air infiltration. The drainage system handles liquid water intrusion. And the dehumidifier manages any residual humidity.
Studies by the Advanced Energy research organization in North Carolina demonstrated that sealed, conditioned crawl spaces maintained average relative humidity levels around 50-55%, compared to 70-80% or higher in vented crawl spaces — a difference that falls well below the threshold for mold growth and wood decay.
Cost Considerations
Encapsulation is a significant investment, typically ranging from $5,000 to $15,000 or more depending on crawl space size, accessibility, existing conditions, and regional labor costs. However, the return on investment includes reduced energy costs (often 15-25% savings on heating and cooling), avoided structural repair costs, improved indoor air quality, and increased home resale value. Many real estate appraisers now recognize encapsulation as a value-adding improvement.
Maintenance and Monitoring for Long-Term Success
Even the best-designed crawl space drainage system requires ongoing attention. A "set it and forget it" mentality is the most common reason that initially effective solutions eventually fail.
Regular Inspection Schedule
Establish a crawl space inspection routine at minimum twice per year — once in spring (after snowmelt and spring rains) and once in fall (before winter freeze). During each inspection, check for:
- Standing water or damp soil
- Sump pump operation (pour water into the basin to trigger the float switch)
- Vapor barrier integrity (tears, displaced sections, standing water on top of the barrier)
- Signs of new moisture staining on foundation walls or framing
- Dehumidifier operation and drain line flow
- Pest activity
- Plumbing condition
Monitoring Technology
Modern wireless humidity and water sensors can be placed in the crawl space and connected to your home Wi-Fi network, providing real-time alerts if humidity exceeds a threshold or standing water is detected. These sensors typically cost $30-$100 each and provide invaluable early warning that allows you to address issues before damage occurs. Some sump pump systems also offer Wi-Fi-connected monitoring that alerts you to pump failures, high water levels, or power outages.
Exterior Maintenance
The exterior components of your drainage system need regular attention too. Clean gutters at least twice per year (more often if you have overhanging trees). Verify that downspout extensions remain connected and properly positioned. Inspect the grade around the foundation annually — soil settles over time, and what was once a proper slope can gradually flatten or reverse. After any significant landscaping, construction, or soil disturbance near the foundation, re-verify drainage patterns.
Dehumidifier and Pump Maintenance
Crawl space dehumidifiers should have their filters cleaned or replaced per manufacturer specifications, typically every 6-12 months. The condensate drain line should be checked for clogs. Sump pumps should be tested quarterly by pouring water into the basin, and the discharge line should be inspected for obstructions, freezing (in winter), or damage. Battery backup systems should have their batteries replaced every 2-3 years, or per manufacturer recommendation.
When to Call a Professional vs. DIY
Some crawl space moisture issues are well within the capability of a competent homeowner, while others demand professional expertise and equipment.
Appropriate DIY Projects
Homeowners with basic skills can typically handle:
- Gutter cleaning and downspout extension: Simple, high-impact improvements that require minimal tools
- Minor regrading: Adding soil to build up the grade near the foundation, provided no utilities are buried in the work area
- Laying a basic vapor barrier: Installing 6-mil or thicker poly sheeting over the crawl space floor (though this is a far cry from full encapsulation)
- Installing a standalone dehumidifier: Placing and connecting a dehumidifier with a gravity drain or condensate pump
Projects Requiring Professional Help
Certain work should be performed by experienced contractors:
- Interior French drain installation: Requires proper slope calculation, correct pipe and gravel selection, and integration with a sump system
- Sump pump installation: Involves electrical work (dedicated circuit with GFCI protection), plumbing, and proper basin sizing and placement
- Full encapsulation: The vapor barrier installation, vent sealing, and system integration require specialized materials and techniques to be effective
- Structural repair: Any work involving damaged joists, sill plates, or foundation walls should be evaluated by a structural engineer and performed by a licensed contractor
- Exterior footing drain installation: Major excavation work that can affect foundation stability if done improperly
Choosing the Right Contractor
When selecting a crawl space contractor, look for companies that perform a thorough diagnostic assessment before proposing solutions. Be wary of contractors who recommend a specific product or system before inspecting the crawl space and identifying the water source. A reputable contractor will:
- Inspect both the interior crawl space and the exterior drainage conditions
- Identify the specific source(s) of moisture
- Explain why their proposed solution addresses those sources
- Provide a detailed written scope of work and warranty
- Hold appropriate licenses and insurance for your jurisdiction
- Provide references from past crawl space projects
Avoid contractors who use high-pressure sales tactics, claim that every crawl space needs full encapsulation regardless of conditions, or cannot clearly explain how their proposed system works.
Building Code Considerations and Best Practices
Crawl space construction and modification are governed by building codes that have evolved significantly in recent years as building science understanding has advanced.
Vented vs. Unvented Crawl Spaces
Traditionally, building codes required foundation vents in crawl spaces based on the theory that ventilation would remove moisture. Research over the past two decades has conclusively demonstrated that in most climates, vented crawl spaces actually perform worse than sealed ones — the vents introduce warm, humid air that condenses on cooler crawl space surfaces, increasing rather than decreasing moisture levels.
The IRC now provides two compliant paths: the traditional vented crawl space (Section R408.1) and the unvented, conditioned crawl space (Section R408.3). The unvented option requires a vapor barrier, sealed vents, and either mechanical conditioning (connection to the HVAC system) or a dehumidifier capable of maintaining acceptable humidity levels. Many states and localities have adopted these provisions, but check your local building department for specific requirements before sealing foundation vents.
Vapor Barrier Requirements
Even in vented crawl spaces, the IRC requires a minimum Class I vapor retarder (typically 6-mil polyethylene) over the crawl space floor, with joints lapped 6 inches and the edges extended at least 6 inches up the foundation wall. For encapsulated crawl spaces, best practice calls for significantly heavier material (12-20 mil) with sealed seams and mechanical attachment to the walls.
Permit Requirements
Permit requirements for crawl space work vary by jurisdiction. In general, installing a sump pump (which involves electrical work) and modifying foundation vents may require permits. Full encapsulation projects that include HVAC modifications almost certainly require permits and inspections. Always check with your local building department before beginning work — unpermitted modifications can create complications during home sales and may void insurance coverage.
Understanding your property's topographic context — how water moves across and beneath your lot — is fundamental to designing effective crawl space drainage. Tools like the USGS National Map Viewer can help you understand the elevation and drainage patterns surrounding your property, providing valuable context for why water may be reaching your foundation and where it can be redirected.
Water in your crawl space is a solvable problem, but it requires the right diagnosis, the right solution, and ongoing vigilance. Whether you're dealing with a minor grading issue or a chronic groundwater challenge, the principles remain the same: identify the source, intercept the water as far from the structure as possible, manage what gets through, and control the moisture environment beneath your home. With proper crawl space drainage and moisture management, your crawl space can go from your home's greatest vulnerability to a clean, dry, controlled environment that protects your investment for decades to come.
See Drainage Intelligence in Practice
Talk with our team or request an invitation to the platform.
Frequently Asked Questions
A small amount of moisture after heavy rain is not uncommon, but it is not something you should accept as normal. Even minor, recurring water intrusion creates conditions for mold growth, wood decay, and pest infestation over time. Any visible water should be investigated and addressed.
Costs vary widely based on the source and severity. Simple exterior fixes like regrading and downspout extensions may cost $500-$2,000. Interior French drain and sump pump systems typically run $3,000-$8,000. Full crawl space encapsulation ranges from $5,000 to $15,000 or more depending on size and conditions.
These solve different problems. A sump pump removes liquid water that enters the crawl space through the soil or walls. A dehumidifier controls airborne moisture and humidity. Many crawl spaces need both — the sump pump handles water intrusion while the dehumidifier manages vapor and condensation.
Modern building science strongly favors sealed (closed) crawl spaces in most climates. Open vents introduce humid outdoor air that condenses on cooler crawl space surfaces, often increasing moisture rather than reducing it. The IRC now allows sealed, conditioned crawl spaces as a code-compliant option, though local code requirements vary.
Yes. Due to the stack effect, 40-50% of the air on your first floor originates from the crawl space. A wet crawl space promotes mold and bacterial growth, and those spores and compounds are drawn into your living space. This can trigger allergies, worsen asthma, and cause respiratory irritation, especially in sensitive individuals.
Inspect during and after rain. Water entering through wall cracks or the wall-floor joint, concentrated on one side, usually indicates surface runoff. Water rising uniformly across the floor suggests groundwater. The plastic sheet test — taping clear plastic to the floor for 48-72 hours — can help determine if moisture is rising from the soil below.
Related Articles
Retaining Wall Drainage: Why Walls Fail Without It
Water in Your Basement After Rain: How to Diagnose the Source