Retaining Wall Drainage: Why Walls Fail Without It
Retaining walls are among the most common and most consequential structures in residential landscaping. They hold back earth, create usable yard space on sloped lots, and protect foundations from lateral soil pressure. Yet the single most frequent cause of retaining wall failure has nothing to do with the strength of the blocks, the quality of the mortar, or the depth of the footing. It comes down to water. Specifically, it comes down to retaining wall drainage — or the lack of it.
When water accumulates in the soil behind a retaining wall, it generates hydrostatic pressure that can exceed the wall's structural capacity within a single storm event. Weep holes, perforated drain pipes, granular backfill, and waterproof membranes all work together to relieve that pressure. Remove any one of those components, and you set the stage for bulging, cracking, leaning, and eventual collapse. This article explains exactly how water destroys retaining walls, how each drainage component functions, and how to build — or retrofit — a wall that will last for decades.
How Hydrostatic Pressure Destroys Retaining Walls
Every retaining wall exists to resist lateral earth pressure — the horizontal force that soil exerts against a vertical surface. Engineers calculate this force using well-established formulas (Rankine's or Coulomb's earth pressure theory) that account for soil unit weight, internal friction angle, and wall geometry. A well-designed wall handles these forces with a comfortable safety margin under normal conditions. The problem begins when water enters the equation.
Water is roughly 62.4 pounds per cubic foot. When it saturates the soil behind a retaining wall, it adds its own weight to the retained mass and, more critically, it generates hydrostatic pressure that acts independently of the soil. Hydrostatic pressure increases linearly with depth: at 4 feet below a saturated surface, the water alone exerts approximately 250 pounds per square foot of lateral force against the wall. For a wall that was designed to handle dry or moist soil conditions, this additional load can represent a 40–60% increase in total lateral pressure.
The effect is not gradual. During a heavy rain event, water can saturate the backfill zone in a matter of hours. If the wall has no drainage system, the water has nowhere to go. It pools, it rises, and it pushes. Walls that have stood for years without visible distress can develop cracks or begin leaning after a single prolonged storm. Freeze-thaw cycles compound the problem in cold climates: water trapped in soil pores expands by roughly 9% when it freezes, generating frost heave pressures that can exceed 10,000 pounds per square foot in extreme cases.
Recognizing the Warning Signs
Hydrostatic pressure damage follows a predictable progression. The earliest sign is usually efflorescence — white mineral deposits on the face of a masonry or concrete wall, indicating that water is migrating through the structure. Next come horizontal cracks, which typically appear along mortar joints in block walls or at construction joints in poured concrete. These cracks indicate that the wall is bending under lateral load.
As pressure increases, the wall begins to lean or bulge outward. A lean of more than 1 inch per foot of wall height is generally considered a structural concern. Finally, if the drainage problem is not corrected, the wall will experience a shear or overturning failure. At that point, repair is rarely feasible — full reconstruction is required.
The Economics of Failure
Rebuilding a failed retaining wall typically costs 2–4 times more than the original construction because the project now includes demolition, soil removal, potential damage to adjacent structures or landscaping, and engineering review. A 50-foot-long wall that cost $15,000 to build might cost $40,000–$60,000 to reconstruct after failure. Proper retaining wall drainage adds roughly 10–15% to initial construction costs — an investment that pays for itself many times over.
The Complete Retaining Wall Drainage System
Effective retaining wall drainage is not a single component. It is a system of interconnected elements that work together to intercept water, channel it away from the wall, and prevent soil saturation in the backfill zone. Each element serves a specific function, and omitting any one of them compromises the entire system.
The core components are:
- Granular backfill — A zone of clean, free-draining aggregate directly behind the wall that allows water to flow downward by gravity rather than building up laterally.
- Perforated drain pipe — A pipe installed at the base of the wall, within the granular backfill, that collects water and channels it to a discharge point.
- Filter fabric (geotextile) — A permeable membrane that separates the granular backfill from the native soil, preventing fine particles from migrating into the aggregate and clogging the drainage system.
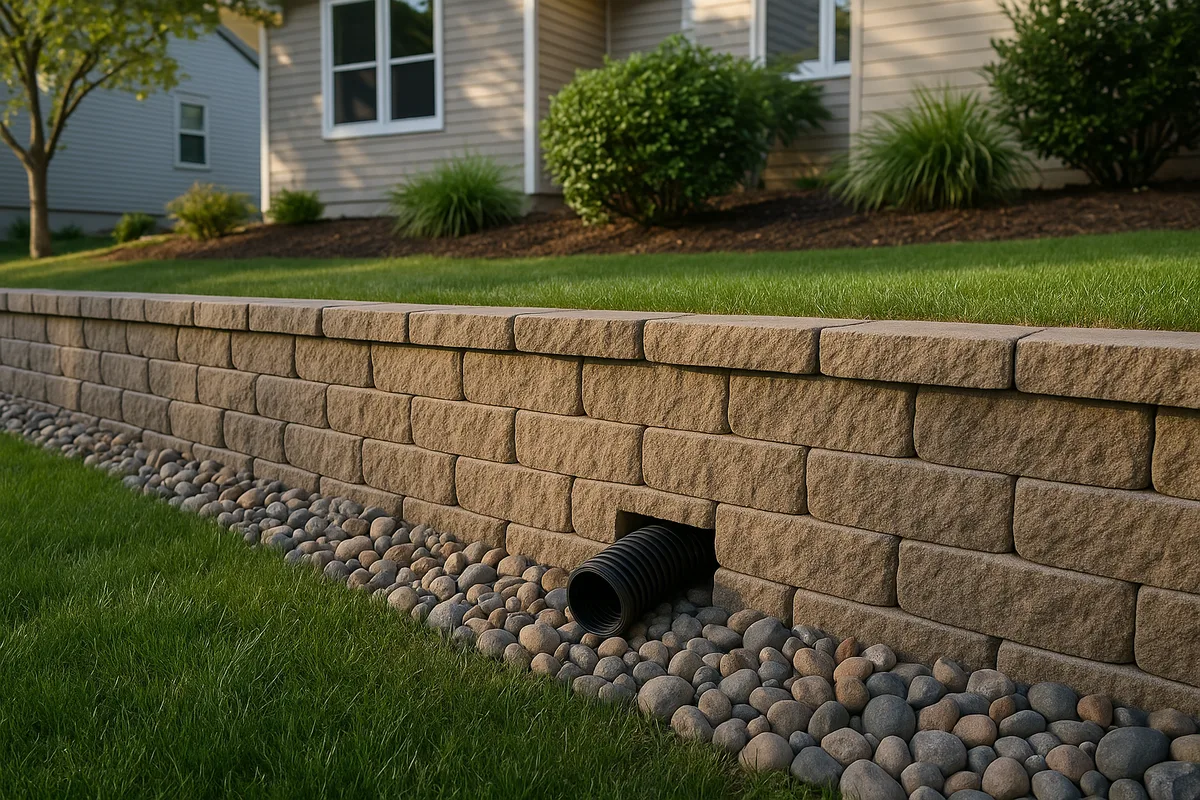
- Weep holes — Openings through the face of the wall that allow water to pass through and discharge on the downhill side.
- Waterproof membrane — A barrier applied to the back face of the wall that prevents water from penetrating the wall material itself.
- Surface drainage controls — Grading, swales, or gutters above the wall that divert surface runoff away from the backfill zone.
When all six components are present and properly installed, the soil behind the wall remains at or near its optimum moisture content. Hydrostatic pressure never builds to dangerous levels. The wall performs as designed for its full service life.
Weep Holes: The Wall's Pressure Relief Valves
Weep holes are the most visible — and most frequently misunderstood — component of retaining wall drainage. They are simply openings through the wall face that allow water to escape from the backfill zone. Despite their simplicity, they are remarkably effective at preventing hydrostatic pressure buildup, and their absence is one of the most common deficiencies found during home inspections of retaining walls.
How Weep Holes Work
The physics are straightforward. Water in the granular backfill zone flows downward under gravity until it reaches the base of the wall. If the only exit is a drain pipe at the bottom, the water must travel the full length of the pipe to reach a discharge point — and if the pipe is undersized, partially clogged, or has insufficient slope, water can back up. Weep holes provide a secondary (or in some designs, primary) exit path by allowing water to pass directly through the wall at multiple points.
Each weep hole acts as an individual pressure relief point. Even if some become partially obstructed by mineral deposits or soil, the remaining holes continue to function. This redundancy is one of the key advantages of weep holes over relying solely on a single drain pipe.
Sizing and Spacing Standards
Industry best practice for weep holes in residential retaining walls follows these general guidelines:
- Diameter: Minimum 2 inches for round weep holes. Some builders use 3-inch or 4-inch PVC pipe sections for larger walls.
- Horizontal spacing: 4 to 6 feet on center along the base of the wall. Walls retaining clay-heavy soils or walls in high-rainfall areas should use the tighter 4-foot spacing.
- Vertical placement: The first row of weep holes should be located within 12 inches of the finished grade at the base of the wall. For walls taller than 6 feet, a second row at mid-height is recommended.
- Slope: Each weep hole pipe should slope slightly downward (minimum 1%) from back to front to ensure positive drainage.
- Filter protection: The backfill end of each weep hole should be covered with filter fabric or a mesh screen to prevent aggregate or soil from entering and clogging the opening.
For segmental retaining walls (SRWs) built with interlocking concrete blocks, weep holes are often created by leaving gaps between blocks in the lowest course or by inserting short sections of PVC pipe through the joints. For poured concrete walls, weep holes are typically formed by embedding PVC pipe sections into the formwork before the pour.
Common Weep Hole Mistakes
The most frequent errors with weep holes include:
- Installing them too high. Weep holes placed more than 18 inches above the base of the wall allow water to accumulate in the lower zone, where hydrostatic pressure is greatest.
- Omitting filter protection. Without a filter, soil particles migrate into the weep hole and eventually seal it shut.
- Spacing them too far apart. Weep holes at 8- or 10-foot intervals may not provide sufficient drainage capacity during heavy rain events.
- Covering them with landscaping. Mulch, soil, or plantings piled against the base of the wall can block weep hole outlets. A minimum 6-inch clear zone should be maintained around each outlet.
Drain Pipe Installation Behind Retaining Walls
While weep holes provide critical pressure relief, they work best in conjunction with a perforated drain pipe installed at the base of the wall. This pipe — often called a "French drain" in this context — collects water from the entire length of the backfill zone and channels it to a designated discharge point, such as a storm drain, daylight outlet, or dry well.
Pipe Selection
The most common pipe materials for retaining wall drainage are:
- Corrugated HDPE (High-Density Polyethylene): Available in 4-inch and 6-inch diameters, this is the most widely used pipe for residential retaining wall drainage. It is lightweight, flexible, and available with factory-installed filter sock to prevent sediment intrusion. The corrugated profile provides some crush resistance, though it is not suitable for applications with heavy surcharge loads directly over the pipe.
- Smooth-wall PVC (Schedule 40 or SDR 35): Offers superior flow capacity compared to corrugated pipe of the same diameter because the smooth interior creates less friction. It is more rigid, which can be an advantage in deep installations. Perforations must be drilled in the field or specified at the time of purchase.
- Rigid perforated PVC: A good middle ground that combines the smooth interior of PVC with factory perforations. Available in 4-inch and 6-inch diameters.
For most residential retaining walls up to 6 feet in height, a 4-inch perforated pipe is adequate. Walls taller than 6 feet, walls longer than 50 feet, or walls in areas with high water tables should use 6-inch pipe.
Installation Best Practices
Proper drain pipe installation follows a specific sequence:
- Excavate the footing trench to the specified depth and width. The trench should extend at least 12 inches behind the back face of the wall.
- Place a layer of filter fabric in the trench, leaving enough excess on each side to wrap over the top of the gravel later.
- Add 4–6 inches of clean, washed gravel (typically 3/4-inch to 1-1/2-inch crushed stone) to the bottom of the trench.
- Set the perforated pipe on the gravel bed with the perforations facing down. This is counterintuitive to many installers, but placing the holes downward allows water to rise into the pipe from below rather than requiring the pipe to fill before drainage begins. The pipe should maintain a minimum slope of 1% (1/8 inch per foot) toward the discharge point.
- Cover the pipe with an additional 6–12 inches of gravel.
- Fold the filter fabric over the top of the gravel to create a complete envelope that prevents fine soil particles from entering the drainage zone.
- Continue backfilling with granular material to within 6–12 inches of the surface, then cap with native soil or topsoil for planting.
The discharge end of the pipe must exit to daylight at a point lower than the pipe's inlet. If the site topography does not allow a gravity outlet, the pipe can terminate in a dry well or sump pit with a pump — though gravity discharge is always preferred for reliability.
Backfill Materials: The Hidden Key to Wall Longevity
The material placed directly behind a retaining wall has a greater impact on long-term performance than almost any other construction decision. Native soil — particularly clay-rich soil — is the enemy of retaining wall drainage. Clay soils have permeability rates as low as 0.01 inches per hour, meaning they hold water rather than draining it. When clay soil is used as backfill, it creates a bathtub effect: water enters from the surface but cannot drain through the soil fast enough to prevent saturation.
Recommended Backfill Specifications
The ideal backfill for the drainage zone behind a retaining wall is clean, angular, well-graded crushed stone. Specific recommendations include:
- Material: Crushed limestone, granite, or similar hard rock. Avoid rounded river gravel, which has fewer contact points and is more prone to settlement.
- Gradation: 3/4-inch to 1-1/2-inch nominal size. This gradation provides excellent permeability (typically 10–100 inches per hour) while maintaining structural stability.
- Fines content: Less than 5% passing the No. 200 sieve. Excessive fines reduce permeability and can clog the drainage system over time.
- Drainage zone width: Minimum 12 inches behind the wall face. For walls taller than 4 feet, a width of 18–24 inches is recommended.
- Drainage zone height: Extend the granular backfill from the drain pipe at the base to within 6–12 inches of the top of the wall.
The cost difference between using proper granular backfill and simply pushing native soil back against the wall is typically $3–$8 per square foot of wall face. On a 4-foot-tall, 40-foot-long wall, this amounts to roughly $500–$1,300 — a small fraction of the total project cost and a negligible amount compared to the cost of failure.
The Role of Geotextile Filter Fabric
Filter fabric serves as the boundary between the granular backfill and the native soil. Without it, fine particles from the native soil gradually migrate into the gravel under the influence of water flow — a process called piping. Over months and years, these fine particles fill the void spaces in the gravel, reducing its permeability and eventually rendering the drainage system non-functional.
Non-woven geotextile fabric is the standard choice for retaining wall applications. It should have a minimum apparent opening size (AOS) of 70–100 (US standard sieve), a flow rate of at least 80 gallons per minute per square foot, and sufficient tensile strength to resist tearing during backfill placement. The fabric should be lapped at least 12 inches at all seams and secured with landscape staples to prevent displacement during construction.
Waterproof Membranes and Wall Protection
Even with excellent drainage behind the wall, some water will inevitably contact the back face of the structure. Over time, this moisture can degrade concrete, corrode reinforcing steel, and cause efflorescence or spalling on the exposed face. A waterproof membrane applied to the back of the wall provides an additional layer of protection.
Membrane Types
Several membrane systems are commonly used for retaining wall waterproofing:
- Sheet membranes (peel-and-stick): Self-adhering rubberized asphalt membranes, typically 40–60 mils thick. These provide excellent waterproofing and are relatively easy to install on smooth concrete surfaces. They are less effective on rough or irregular surfaces like split-face block.
- Fluid-applied membranes: Sprayed or rolled-on coatings that cure to form a seamless waterproof barrier. These conform well to irregular surfaces and are available in both solvent-based and water-based formulations. Typical dry film thickness is 40–60 mils.
- Dimple board (drainage mat): A high-density polyethylene sheet with raised dimples that creates an air gap between the membrane and the wall. Water that reaches the back of the wall flows down the dimple channels to the drain pipe at the base. Dimple board serves double duty as both a waterproof barrier and a drainage layer.
For most residential retaining walls, dimple board is the most practical choice because it combines waterproofing and drainage in a single product. It is installed with the dimples facing the wall, creating channels for water flow, and the flat side facing the backfill. Filter fabric is typically bonded to the flat side to prevent soil intrusion into the dimple channels.
When Waterproofing Is Essential vs. Optional
Waterproofing is essential for any retaining wall that:
- Retains soil against a habitable structure (basement wall, below-grade living space)
- Is constructed of reinforced concrete with rebar that is susceptible to corrosion
- Is taller than 4 feet
- Is located in an area with a high water table or heavy rainfall
For short landscape walls (under 3 feet) built with segmental blocks and proper granular backfill, waterproofing is generally optional but still beneficial for long-term durability.
Surface Drainage: Controlling Water Before It Reaches the Wall
The most effective drainage system behind a retaining wall can be overwhelmed if surface water is allowed to flow unchecked into the backfill zone. Controlling surface drainage above the wall is the first line of defense — and it is frequently overlooked.
Grading Above the Wall
The ground surface behind (above) the retaining wall should slope away from the wall at a minimum grade of 2% (1/4 inch per foot) for at least 10 feet. This directs surface runoff away from the backfill zone and reduces the volume of water that the subsurface drainage system must handle.
If the topography does not allow positive grading away from the wall — for example, if the wall is at the base of a hillside — a swale or interceptor drain should be installed uphill of the wall to capture and redirect surface flow. A swale is simply a shallow, vegetated channel with a minimum cross-slope of 2% and a longitudinal slope of at least 1%. It should discharge to a storm drain, rain garden, or other approved outlet.
Roof Runoff and Downspouts
Roof runoff is a concentrated source of water that can quickly overwhelm retaining wall drainage if discharged into the backfill zone. Downspouts from buildings above or adjacent to a retaining wall should be connected to solid (non-perforated) pipe and routed to a discharge point well beyond the wall's zone of influence — typically at least 10 feet from the back face of the wall.
A single downspout serving 500 square feet of roof area can deliver approximately 300 gallons of water during a 1-inch rain event. If that water is discharged directly behind a retaining wall, it can saturate the backfill in minutes. This is one of the most common — and most easily preventable — causes of retaining wall drainage failure.
Impervious Surface Considerations
Driveways, patios, and walkways above a retaining wall create impervious surfaces that concentrate runoff. If these surfaces slope toward the wall, they can deliver large volumes of water to the backfill zone during rain events. Proper design includes sloping these surfaces away from the wall or installing trench drains, channel drains, or slot drains to intercept runoff before it reaches the wall.
The NRCS Web Soil Survey is a valuable resource for understanding the drainage characteristics of native soils at your site. Knowing your soil's hydrologic group (A through D, with D being the poorest draining) helps determine how aggressively you need to manage surface water above a retaining wall.
Retrofitting Drainage on Existing Walls
Many homeowners inherit retaining walls that were built without adequate drainage. Retrofitting drainage on an existing wall is more complex and expensive than installing it during original construction, but it is often the only alternative to complete reconstruction.
Assessing the Current Condition
Before investing in a drainage retrofit, assess the wall's structural condition. If the wall has leaned more than 1 inch per foot of height, has large structural cracks (wider than 1/4 inch), or has displaced blocks or sections, the wall may be beyond repair. A structural engineer should evaluate any wall showing significant distress before drainage work begins.
For walls that are structurally sound but showing early signs of water damage (efflorescence, minor cracking, damp spots), a drainage retrofit can extend the wall's service life by decades.
Retrofit Methods
The most effective retrofit approach involves excavating the soil behind the wall and installing a complete drainage system — granular backfill, drain pipe, filter fabric, and waterproof membrane — as described in the preceding sections. This is essentially rebuilding the drainage system from scratch while leaving the wall structure in place.
For walls where full excavation is not feasible (due to adjacent structures, utilities, or mature landscaping), several less invasive options exist:
- Drilling weep holes: For concrete or masonry walls without existing weep holes, holes can be drilled through the wall face using a rotary hammer drill with a masonry bit. Holes should be 2–3 inches in diameter, spaced 4–6 feet apart, and angled slightly downward from back to front. A short section of PVC pipe should be inserted into each hole and sealed with hydraulic cement on the interior face. Filter fabric or a mesh screen should cover the backfill end.
- Installing a vertical drain behind the wall: A narrow trench (12–18 inches wide) can be excavated along the back of the wall to the footing level. A perforated drain pipe is placed at the base, surrounded by gravel and wrapped in filter fabric. This provides a drainage path without requiring full backfill replacement.
- Surface drainage improvements: Adding swales, regrading the surface above the wall, and redirecting downspouts can significantly reduce the volume of water reaching the backfill zone, even without subsurface drainage modifications.
Cost Considerations for Retrofits
Full excavation and drainage installation on an existing wall typically costs 50–75% of the original wall construction cost. For a wall that cost $200 per linear foot to build, expect to pay $100–$150 per linear foot for a complete drainage retrofit. Less invasive methods like drilling weep holes or installing a vertical drain cost considerably less — typically $30–$60 per linear foot — but provide less comprehensive protection.
The decision between full retrofit and partial measures should be based on the severity of the drainage problem, the value of the wall and the property it protects, and the cost of eventual reconstruction if the wall fails.
Material-Specific Drainage Considerations
Different retaining wall materials have different vulnerabilities to water damage, and the drainage system should be tailored accordingly.
Concrete Block (CMU) and Segmental Retaining Walls
Concrete masonry units and segmental retaining wall blocks are the most common materials for residential retaining walls. They are porous by nature — standard CMU has a water absorption rate of 5–10% by weight — meaning they readily wick moisture from saturated backfill. This moisture migration causes efflorescence, freeze-thaw damage, and eventual deterioration of the block face.
For block walls, the drainage system should include a waterproof membrane or dimple board on the back face to minimize moisture contact. Weep holes are easily created by leaving gaps in the mortar joints (for CMU) or between blocks (for segmental walls) in the lowest course.
Poured Concrete Walls
Poured concrete walls are more resistant to moisture penetration than block walls, but they are not immune. Water can enter through construction joints, cold joints, tie holes (from formwork), and cracks. Reinforcing steel within the concrete is particularly vulnerable: when water reaches the rebar, it initiates corrosion that causes the steel to expand, cracking the concrete from within (a process called spalling).
For poured concrete walls, a fluid-applied waterproof membrane provides excellent protection because it can seal around tie holes and other irregularities. Weep holes should be formed during the pour by embedding PVC pipe sections through the formwork.
Timber and Boulder Walls
Timber retaining walls are inherently permeable — water passes through the gaps between timbers — so they are less susceptible to hydrostatic pressure buildup than solid masonry or concrete walls. However, prolonged moisture contact accelerates rot, even in pressure-treated lumber. A drainage system behind a timber wall extends the wood's service life by keeping the backfill relatively dry.
Boulder walls (also called riprap or natural stone walls) are the most forgiving of all retaining wall types when it comes to drainage. The gaps between boulders act as natural weep holes, allowing water to pass through freely. However, a drain pipe at the base is still recommended to prevent soil erosion through the gaps, which can undermine the wall's stability over time.
Gabion Walls
Gabion walls — wire baskets filled with stone — are essentially self-draining structures. Water passes freely through the stone fill, and hydrostatic pressure is virtually impossible to develop. Gabion walls are an excellent choice for sites with known drainage challenges, though they have aesthetic limitations that make them less popular in residential settings.
Inspection and Maintenance for Long-Term Performance
A well-designed and properly installed retaining wall drainage system requires minimal maintenance, but it is not maintenance-free. Regular inspection and occasional cleaning will ensure the system continues to function as intended.
Annual Inspection Checklist
Homeowners should inspect their retaining walls and drainage systems at least once per year, ideally in spring after the ground has thawed and before the heavy rain season. Key items to check include:
- Weep holes: Verify that all weep holes are open and unobstructed. Look for water staining below the holes, which indicates they are functioning. If weep holes are dry during or after rain events, they may be clogged internally.
- Wall face: Look for new cracks, efflorescence, bulging, or leaning. Photograph any defects and compare with previous inspections to track changes over time.
- Drain pipe outlets: Verify that the discharge end of the drain pipe is open and flowing during rain events. Clear any debris, sediment, or vegetation that may be blocking the outlet.
- Surface grading: Check that the ground surface above the wall still slopes away from the wall. Settlement, erosion, or landscaping changes can alter the grade over time.
- Vegetation: Remove any trees or large shrubs growing within 5 feet of the wall. Root intrusion can clog drain pipes, displace blocks, and compromise the structural integrity of the wall.
Cleaning Clogged Weep Holes
Weep holes can become clogged with mineral deposits, soil, insect nests, or vegetation. To clean them, insert a stiff wire or plumber's snake into the hole from the front face and work it back and forth to break up the obstruction. For stubborn clogs, a pressure washer with a narrow nozzle can be effective, but use caution to avoid damaging the wall material or displacing the filter fabric behind the hole.
If multiple weep holes are consistently clogging, it may indicate that the filter protection on the backfill side has failed, allowing fine soil particles to enter the drainage system. In this case, a more comprehensive retrofit may be necessary.
Drain Pipe Maintenance
Perforated drain pipes can be cleaned using a sewer jetter (a high-pressure hose with a forward-facing nozzle) inserted through a cleanout fitting at the discharge end. Cleanout fittings should be installed at each end of the pipe and at any changes in direction during original construction. If cleanouts were not installed, they can be added retroactively at the discharge end.
Professional drain cleaning services typically charge $150–$400 for a residential retaining wall drain pipe cleaning. This should be done every 3–5 years as preventive maintenance, or immediately if the drain pipe stops flowing during rain events.
Building It Right the First Time
The most important takeaway about retaining wall drainage is that it must be designed and installed as an integral part of the wall system — not treated as an afterthought. The wall structure and the drainage system are interdependent: neither can perform its function without the other.
Every retaining wall project, regardless of size, should include a drainage plan that addresses subsurface water management (drain pipe, granular backfill, filter fabric), wall protection (waterproof membrane), pressure relief (weep holes), and surface water control (grading, swales, downspout routing). The cost of these components is modest relative to the total project budget, and the consequences of omitting them are severe.
For homeowners planning a new retaining wall, insist that your contractor provide a detailed drainage plan as part of the project proposal. For those living with existing walls, inspect the drainage components regularly and address any deficiencies before they escalate into structural failures. Retaining wall drainage is not glamorous, and it is invisible once the wall is complete — but it is the single most important factor in determining whether your wall stands for 5 years or 50.
See Drainage Intelligence in Practice
Talk with our team or request an invitation to the platform.
Frequently Asked Questions
Weep holes should be spaced 4 to 6 feet apart horizontally along the base of the retaining wall. Use the tighter 4-foot spacing for walls retaining clay-heavy soils or in areas with heavy rainfall. For walls taller than 6 feet, add a second row of weep holes at mid-height.
Without drainage, water saturates the soil behind the wall and creates hydrostatic pressure that can increase lateral force on the wall by 40–60%. This leads to cracking, bulging, leaning, and eventual structural failure. A single heavy rain event can cause damage to a wall that has stood for years without visible problems.
Yes, drainage can be retrofitted on existing walls. Options include drilling weep holes through the wall face, excavating behind the wall to install a drain pipe and gravel backfill, or improving surface grading above the wall. Full excavation is most effective but costs 50–75% of the original wall construction cost.
Use clean, angular crushed stone in 3/4-inch to 1-1/2-inch nominal size with less than 5% fines. This gradation provides permeability rates of 10–100 inches per hour while maintaining structural stability. Avoid rounded river gravel, which settles more and has fewer contact points for stability.
The perforations should face down. This allows water to rise into the pipe from the gravel bed below rather than requiring the pipe to fill with water before drainage begins. Placing holes downward ensures the pipe begins draining at the lowest possible water level.
Warning signs include white mineral deposits (efflorescence) on the wall face, horizontal cracks along mortar joints, damp or wet spots on the wall during dry weather, weep holes that don't flow during rain, and any visible leaning or bulging. Inspect your wall annually, ideally in spring before heavy rains.
Related Articles
How to Diagnose Surface vs. Subsurface Water Problems on Your Property
What Causes Water to Pool in a Yard? 8 Common Drainage Issues Explained